Howdy, Folks! I love blogging. I have to say. It’s fun, rewarding, therapeutic and a great way to meet some awesome people whom I would have never met otherwise. A while back I agreed to team up with some amazing bloggers for a project challenge. Basically, we all had to go buy crates from Michael’s and do something with them. Thus, The Great Crate Challenge was born….

I thought about it for a while, and after some deliberation, decided to take my crates and make a bench for either our foyer or much-neglected front porch.
Before I began, I developed a highly technical plan…

Impressed? 😉
Then, I purchased my materials…
– 3 crates from Michael’s
– 1″ x 12″ x 12′ whitewood board (cut down to (2) 1″ x 10 1/4″ x 55″)
– Bolts, nuts, and washers to bolt the crates together
Other materials, which I already had…
– Wood screws
– Stain/paint
– Wood legs (which I found at Goodwill for practically pennies)…
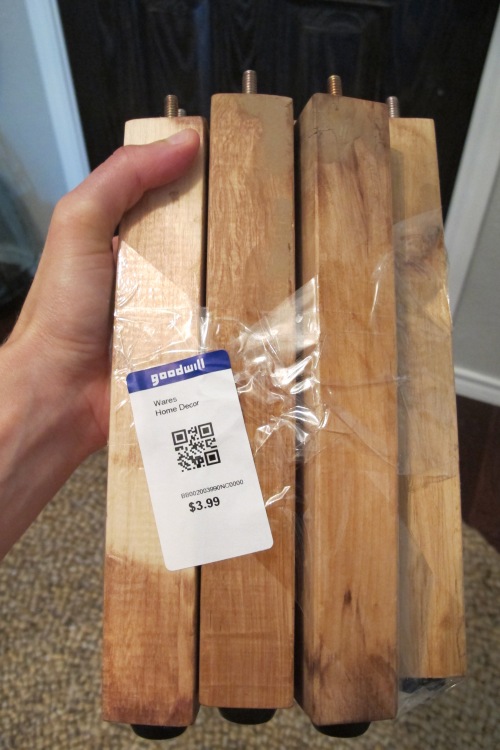
I was cracking up as I left Goodwill that day because the cashier made such a stink that I’d found the legs before her. Heehee! Sorry, lady. Finders keepers. Anyhoo, I’d done some research prior to making my plan, and found that 17-18″ is a good height for a bench, thus these legs were too long. So, Joey cut them down with the miter saw to 4 inch lengths.
Once I had all of my materials together, I did a dry run in the foyer so that I could figure out how I wanted to paint/stain the bench (Lucas helped).

We placed various stained items nearby and tried to visualize which finish would look best. Lucas was no help in deciding. He liked everything. But somehow, I managed to convince my lovely cousin, Kristyn, to babysit AND brainstorm with me all in one day. It was super helpful to bounce ideas off her and I came out deciding to stain the top, bottom and legs and red-wash the crates to give the bench kind of an industrial-old-schoolhouse feel.
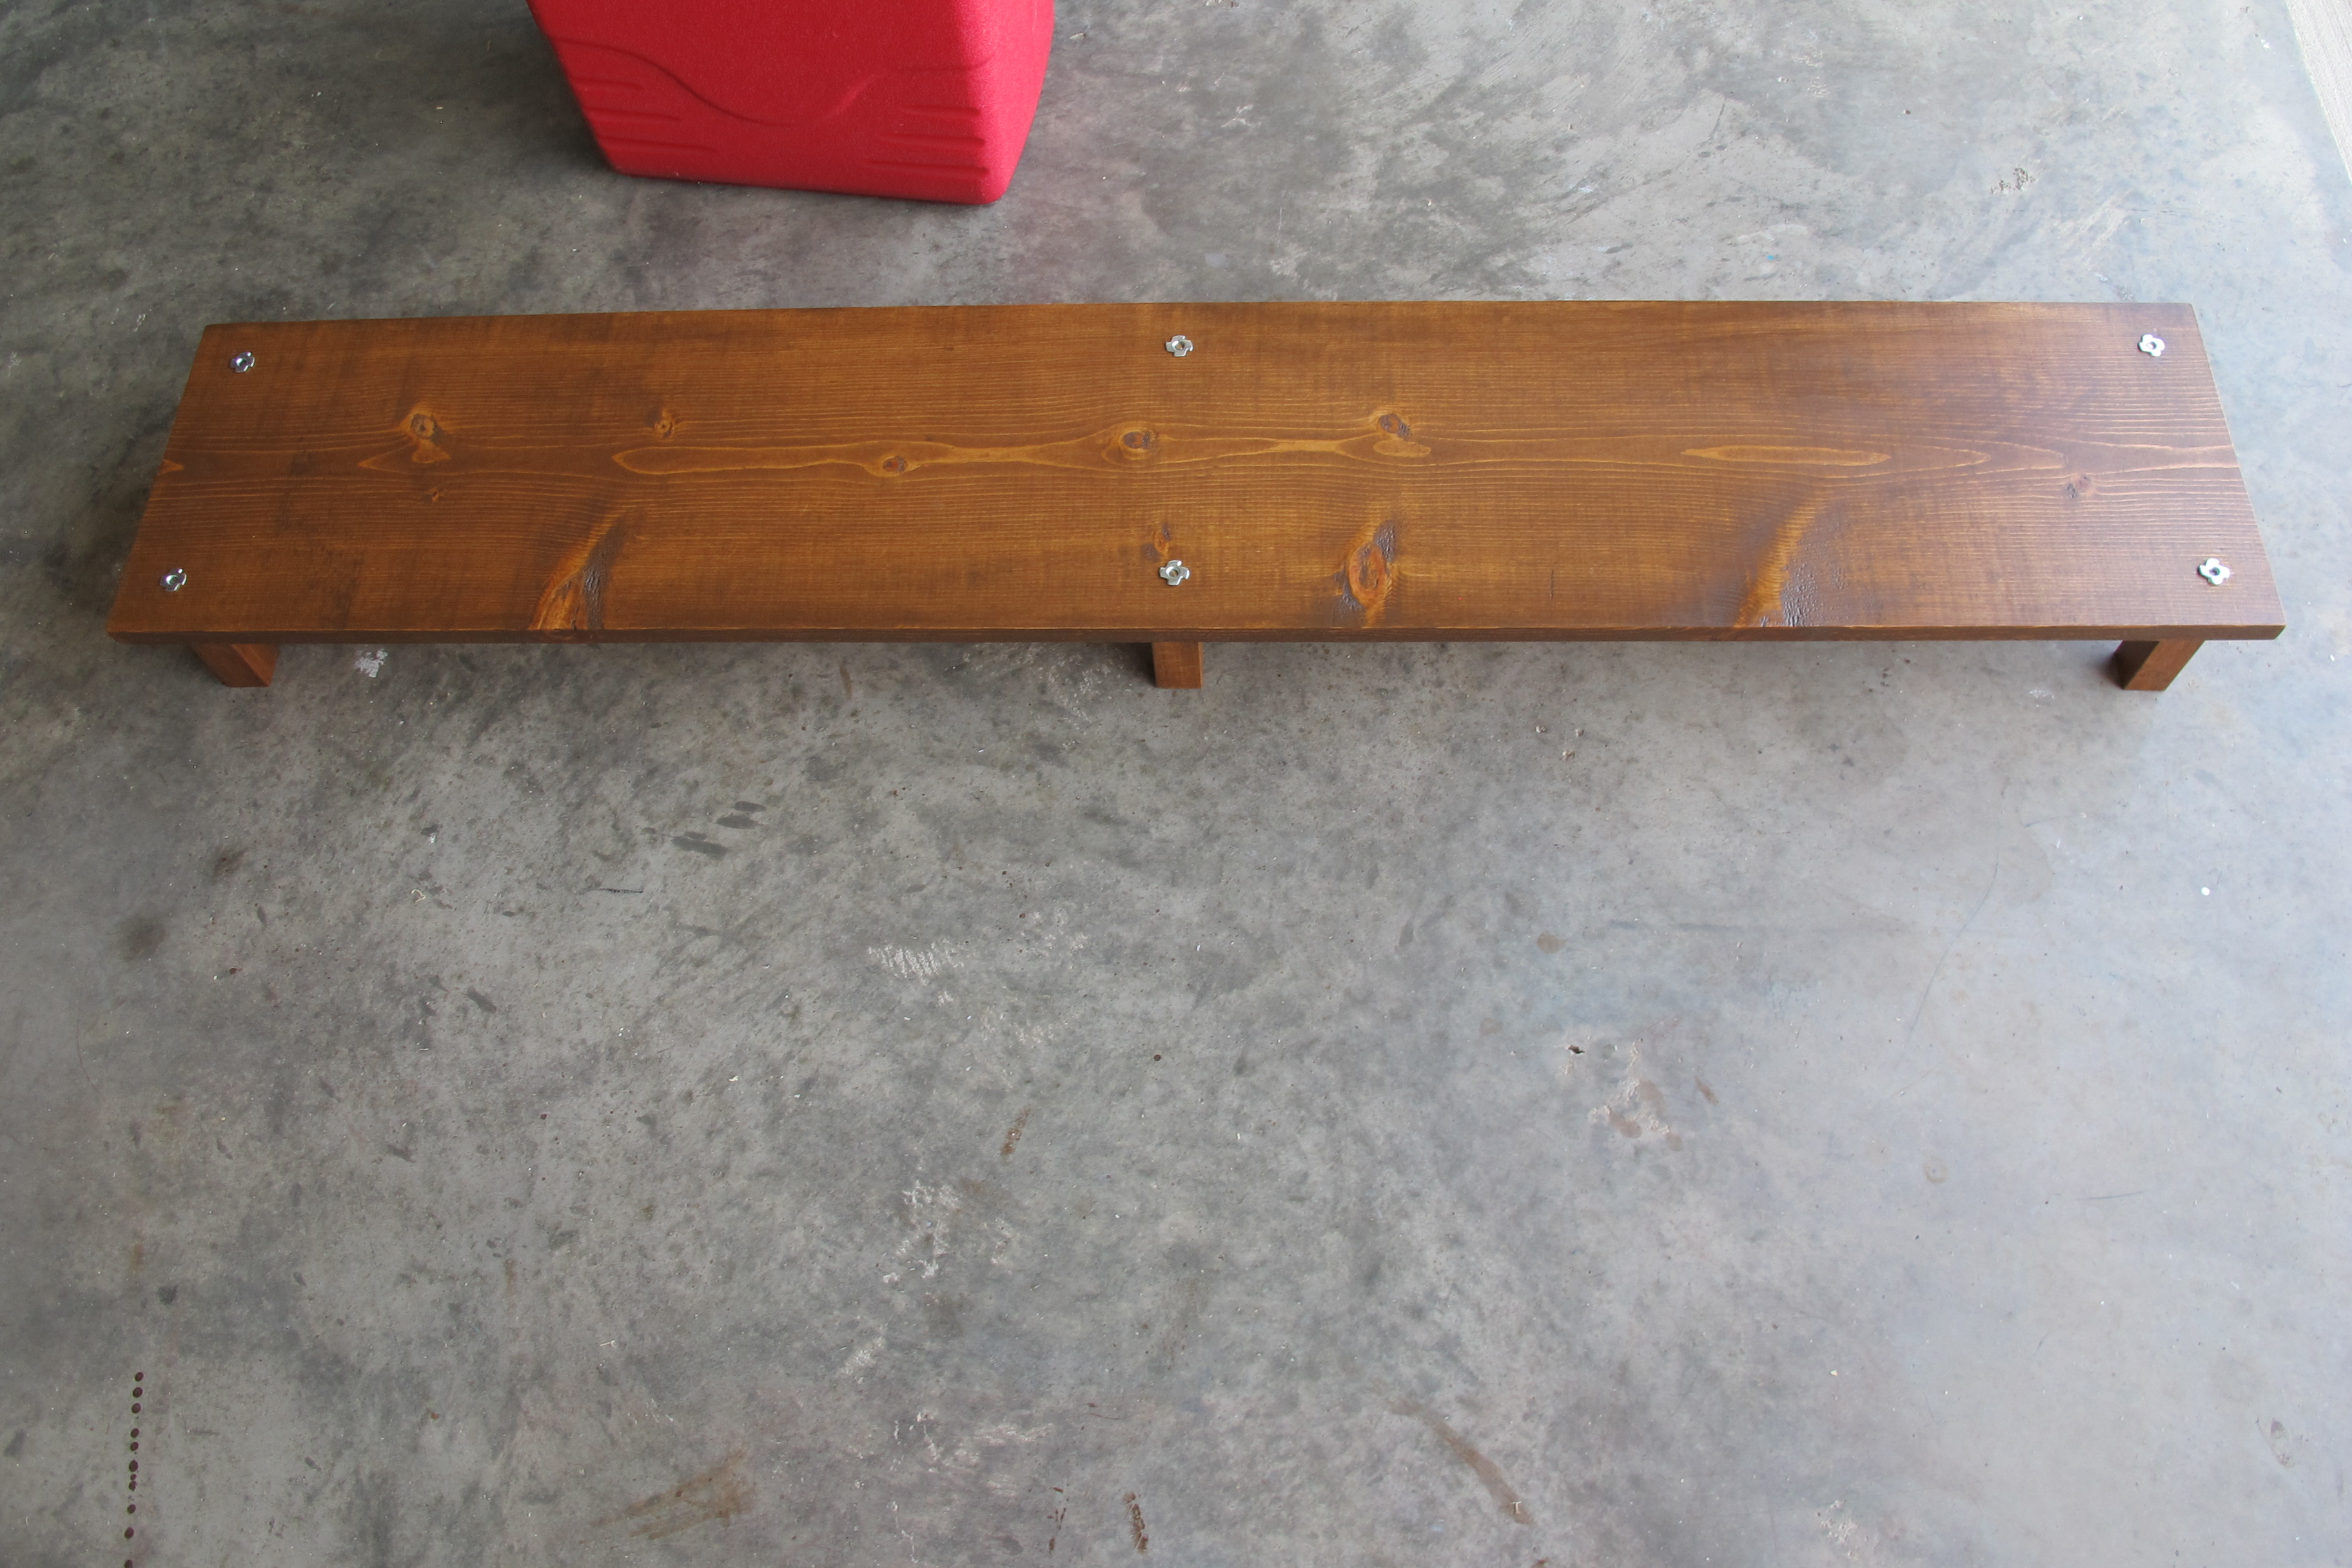
I sanded all of my pieces to take off any splinters or harsh edges. Then, I used Varathane’s Early American stain, applying 2 coats with dry time between to my whitewood pieces and legs. Once the stain had dried, I treated the stained elements with several coats of Formby’s Tung Oil as discussed in this post.

For the crates, I decided to use a red-wash technique so that the woodgrain would still show through. I poured some of this paint…
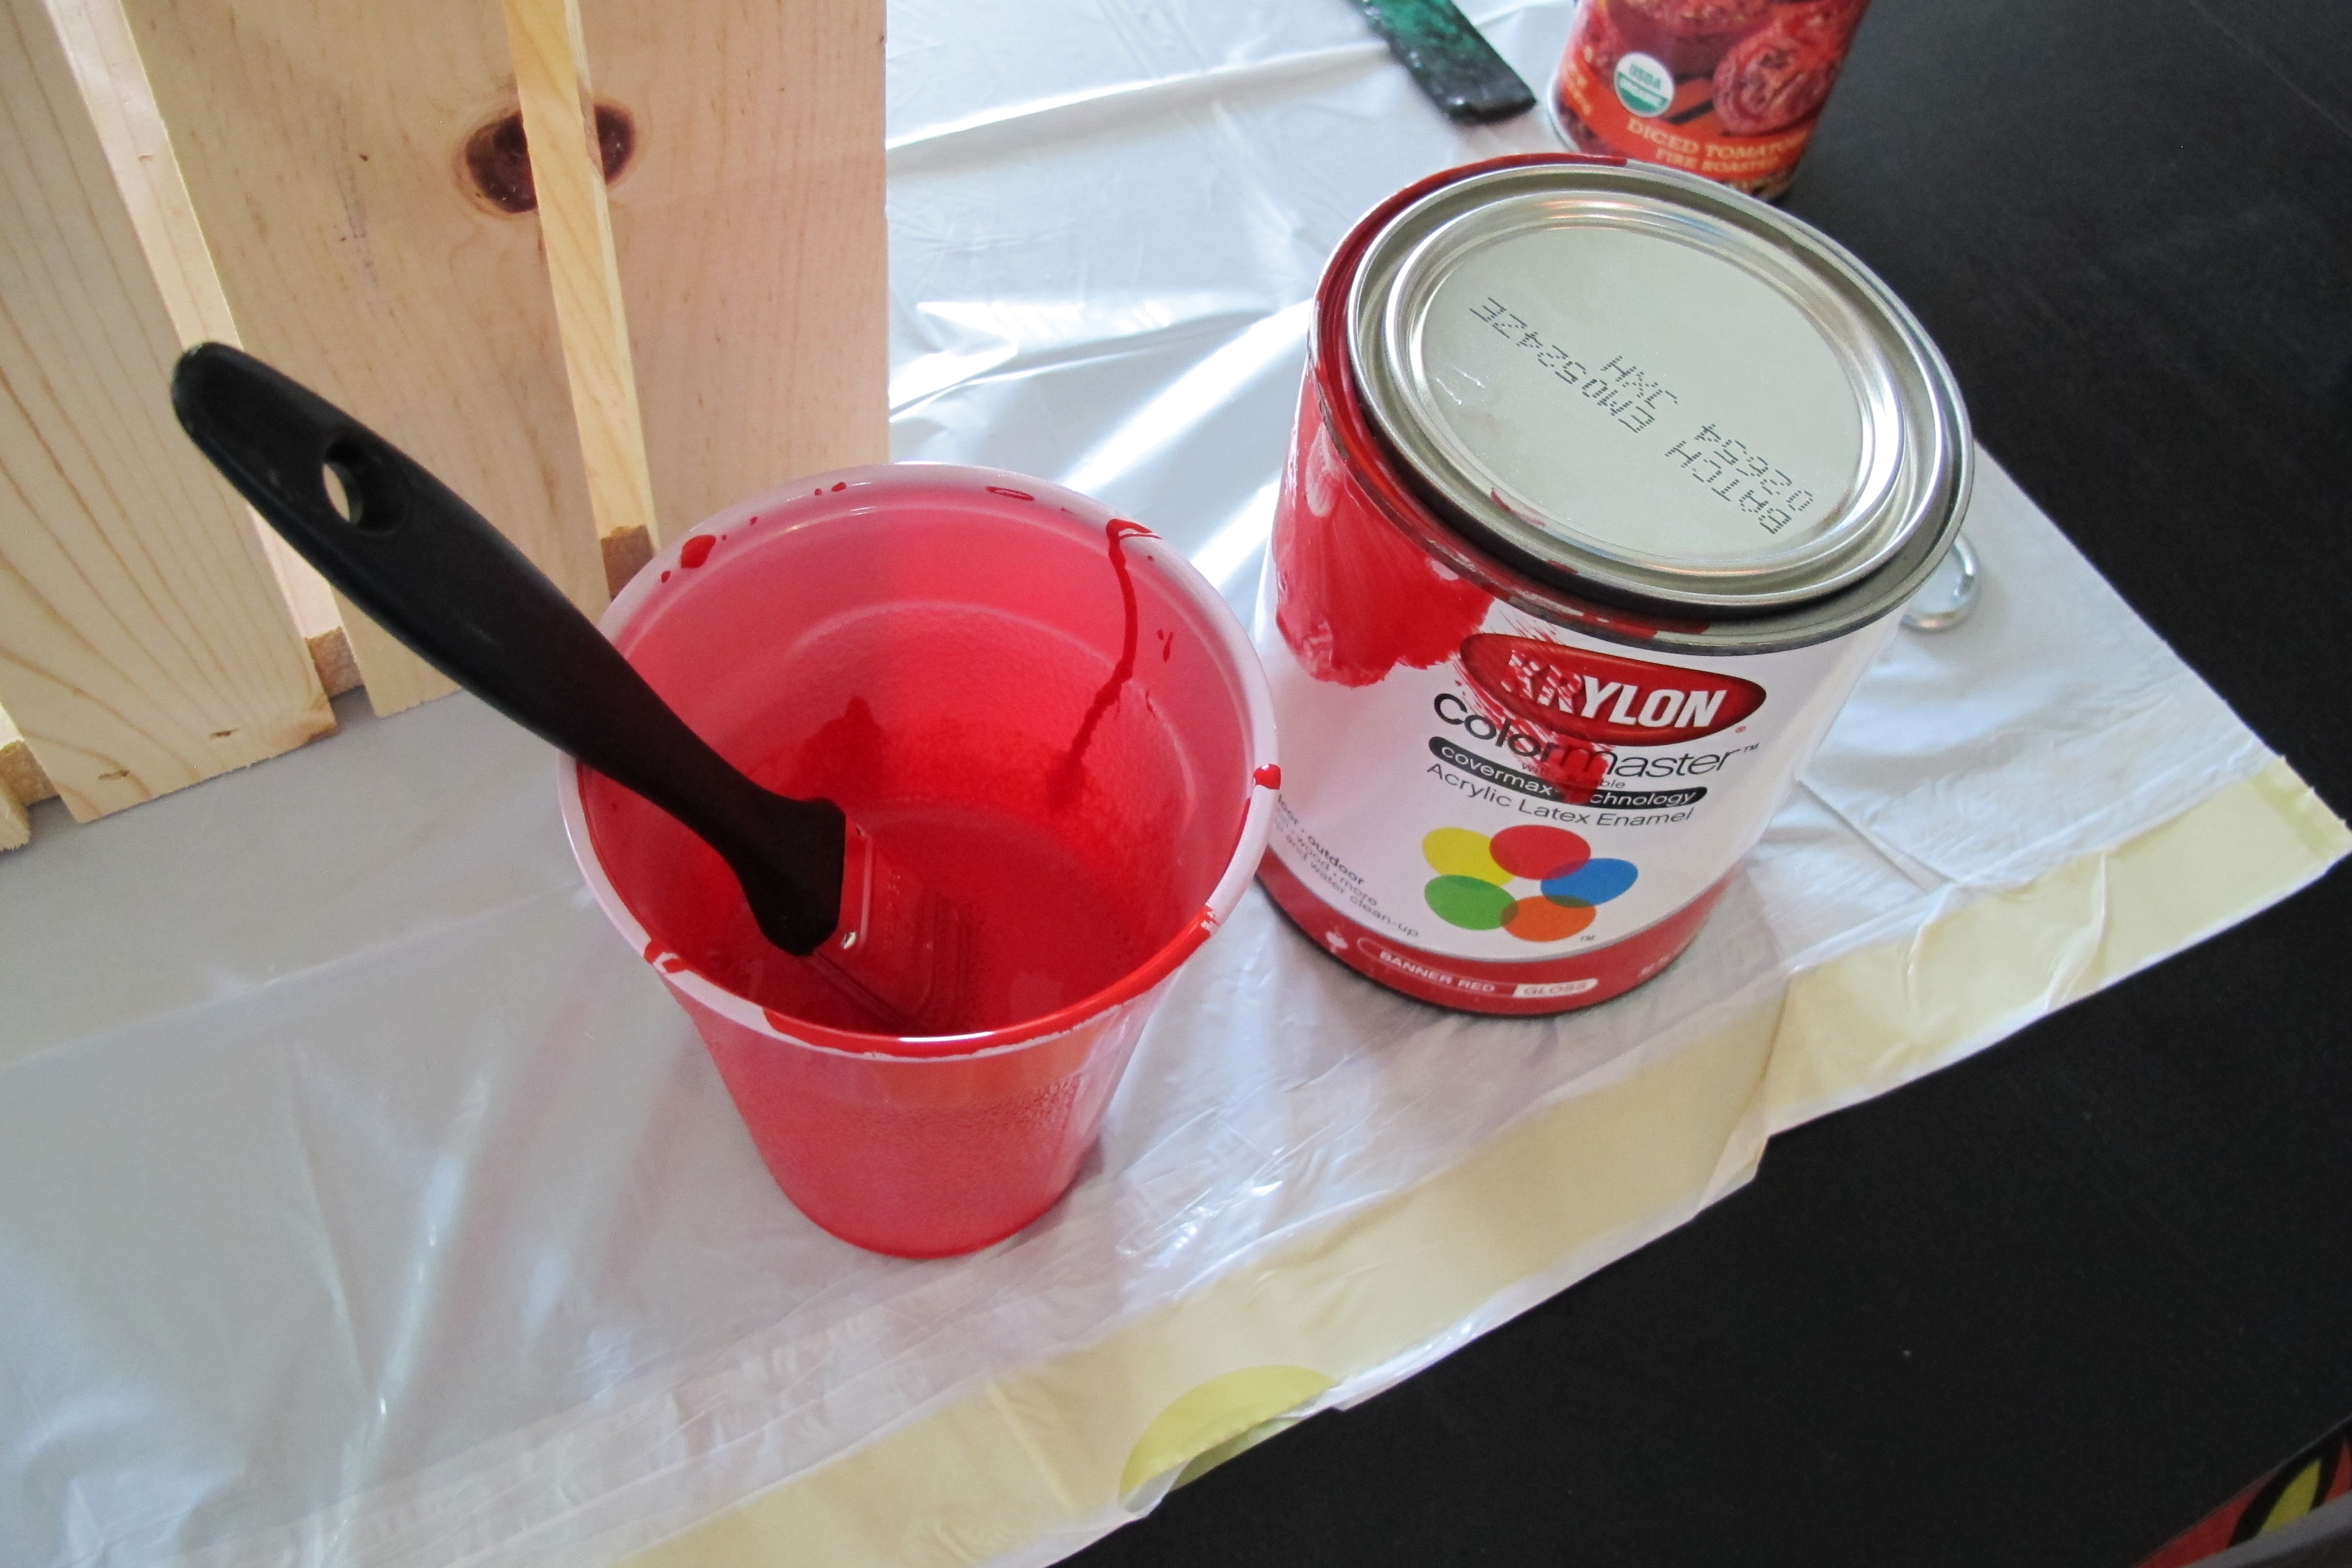
…into a cup and diluted it with equal parts water. I simply painted it on and let it dry. I experimented with wiping off the excess, but that caused the crates to take on a pinkish hue. Not good. Plus, the wood was so absorbent that simply painting it on didn’t leave drips anyways, so I just applied the paint and called it a day.

Once the components had dried, it was assembly time. Joey did most of it with some direction from me per my plan. We started by attaching the legs to the bottom. This was a bit of a different process for us because of the random Goodwill legs I’d found. The screws on top were much too long for the standard brackets sold at home improvement stores. Luckily, Joey figured out that the metal threading that held the feet in place on the bottoms of the legs (the part that he’d cut off) fit the screws perfectly. So, he removed them…

He drilled holes in the bottom board where the legs would go and played around with the components to determine the most secure way to attach them. Ultimately, he found that inserting the metal screw-catch thing (technical term) to the opposite side of the board allowed the legs to be attached more securely. (Note: If you simply purchase legs from Lowe’s or Home Depot or whatever, you can purchase metal brackets right along with them to secure the legs, easy-peasy.)

You can see here how the metal threads are on the top side. The screw catches the thread from the opposite direction holding the legs snugly to the board…
Next, he bolted the crates together using a clamp to keep everything flush and lined up…

Once the crates were bolted together, he screwed the crates to the bottom using wood screws….

…and repeated the process with the top…

Once we’d completed our new baby bench, I tried it in the foyer and then on the porch. And the porch won out. Big time. (HEADLINE: Porch Engages in Victory Dance While Foyer Weeps Rocking In Fetal Position)…

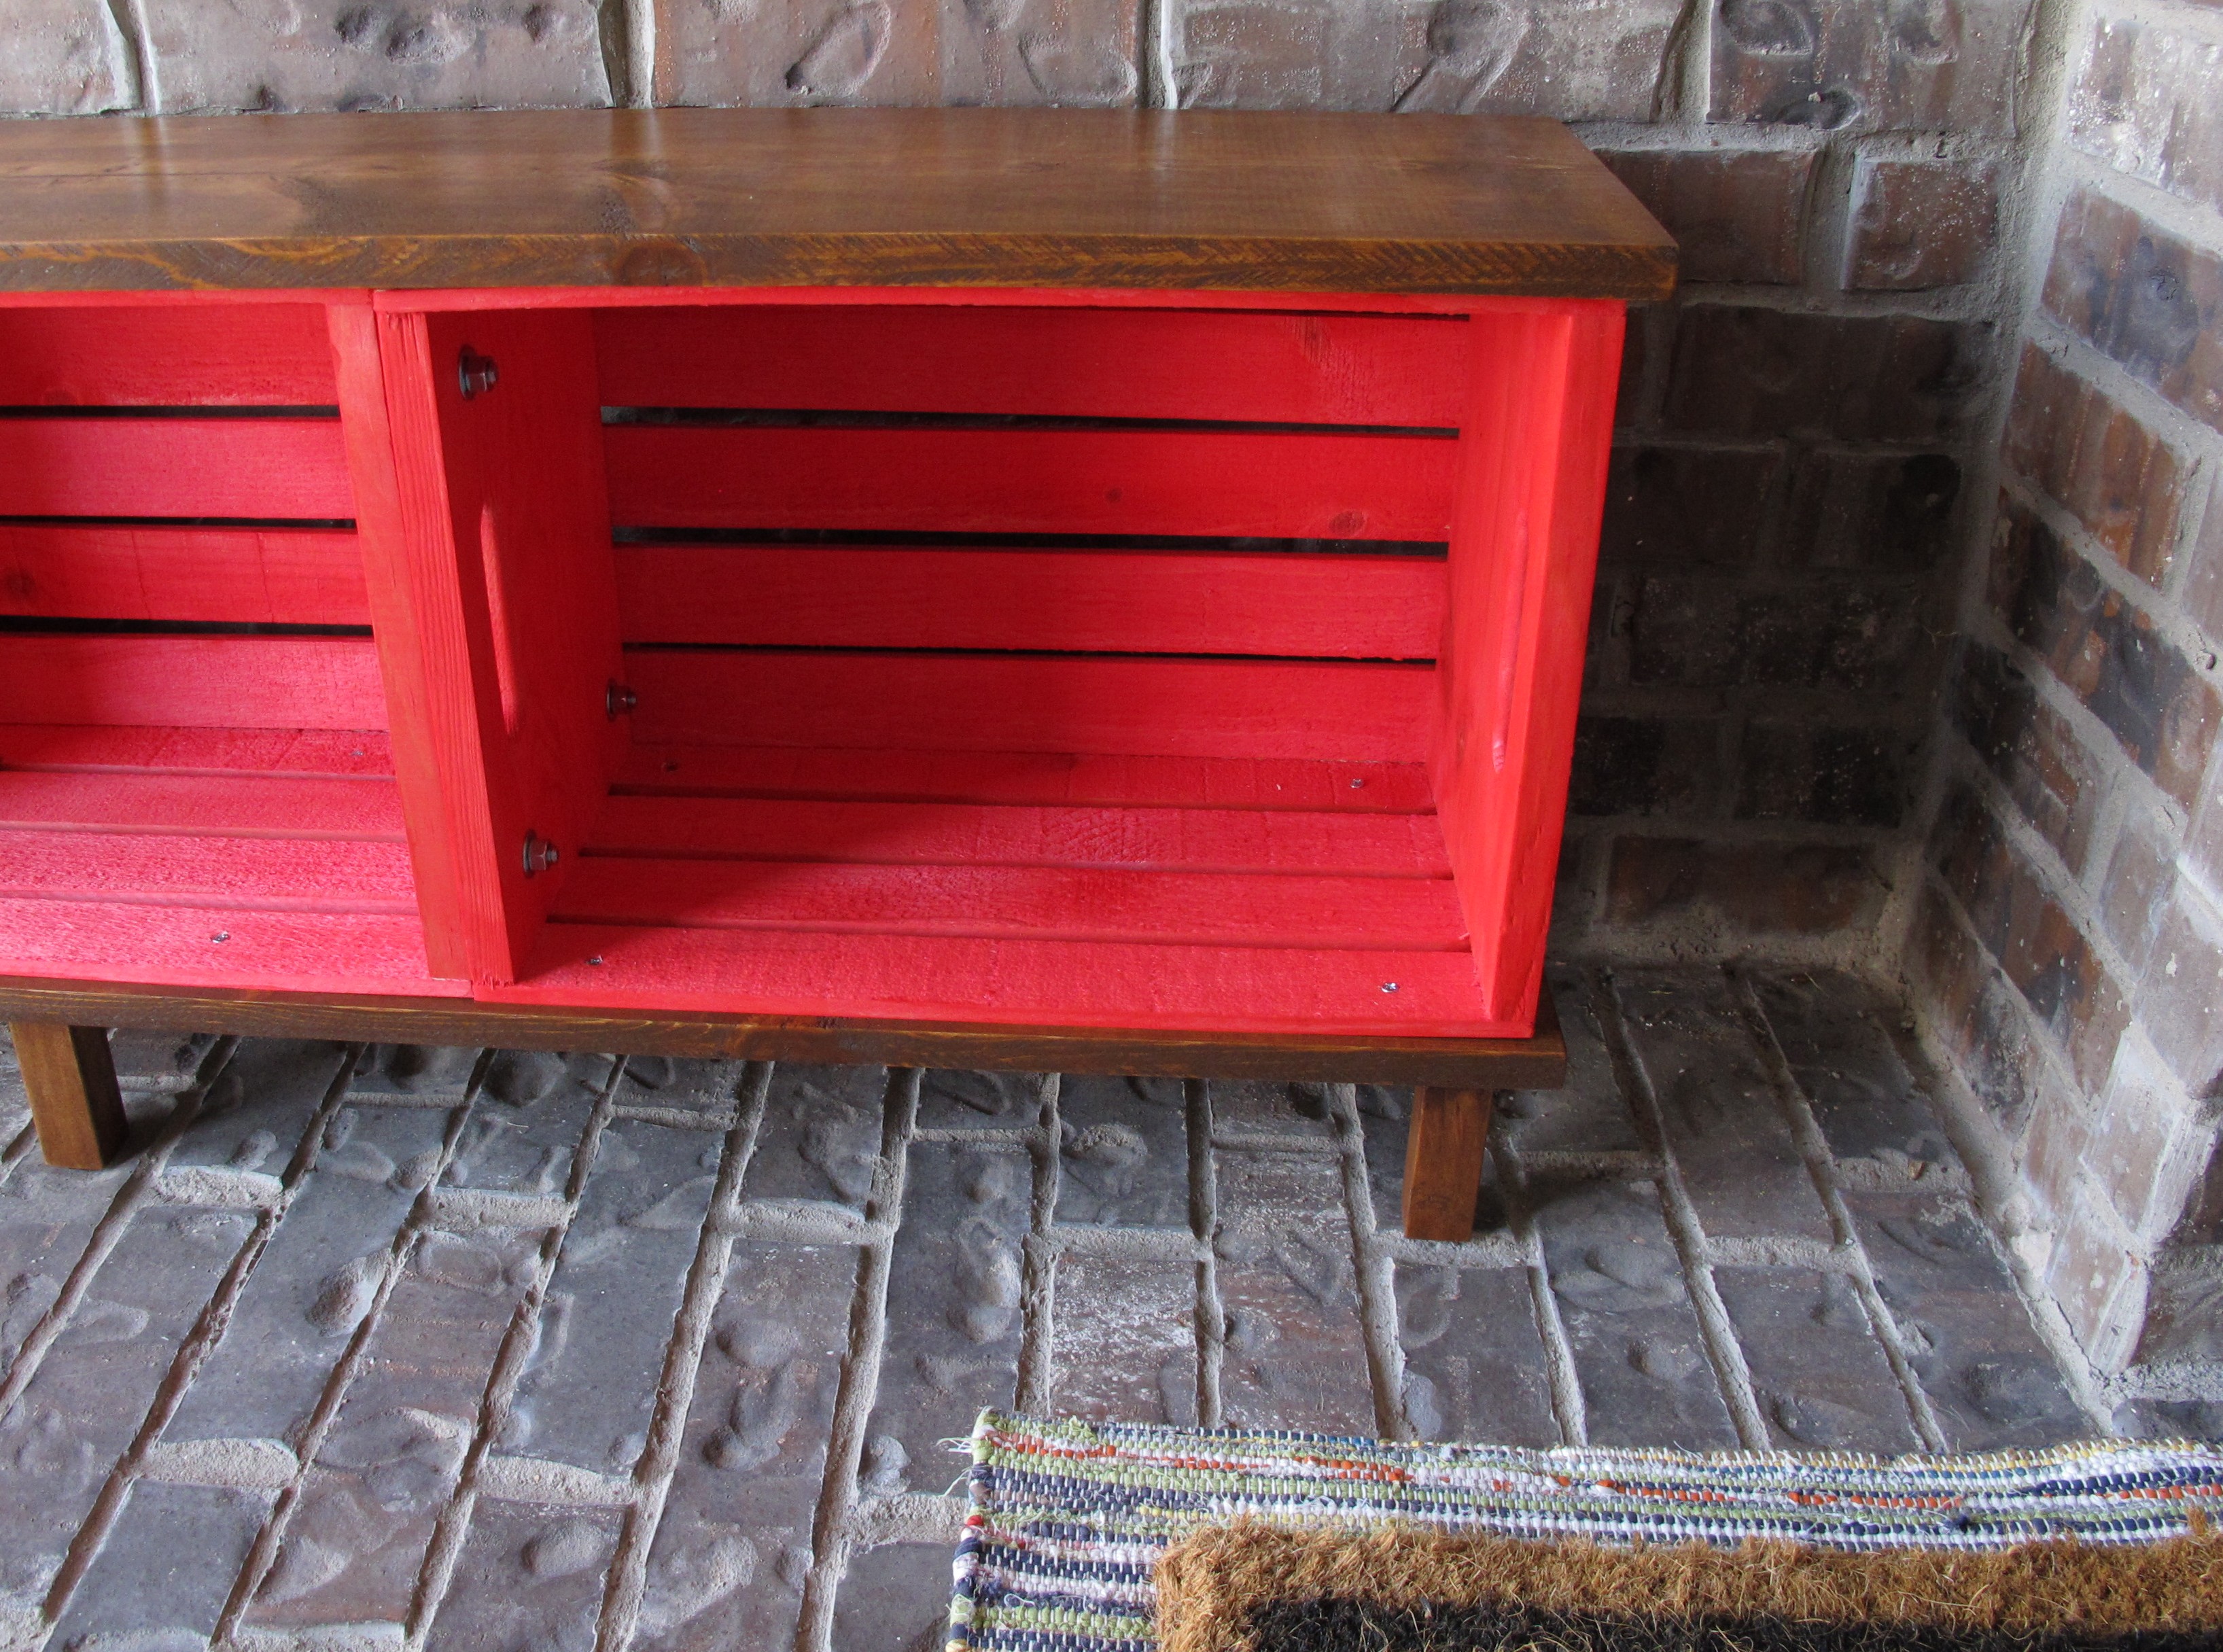


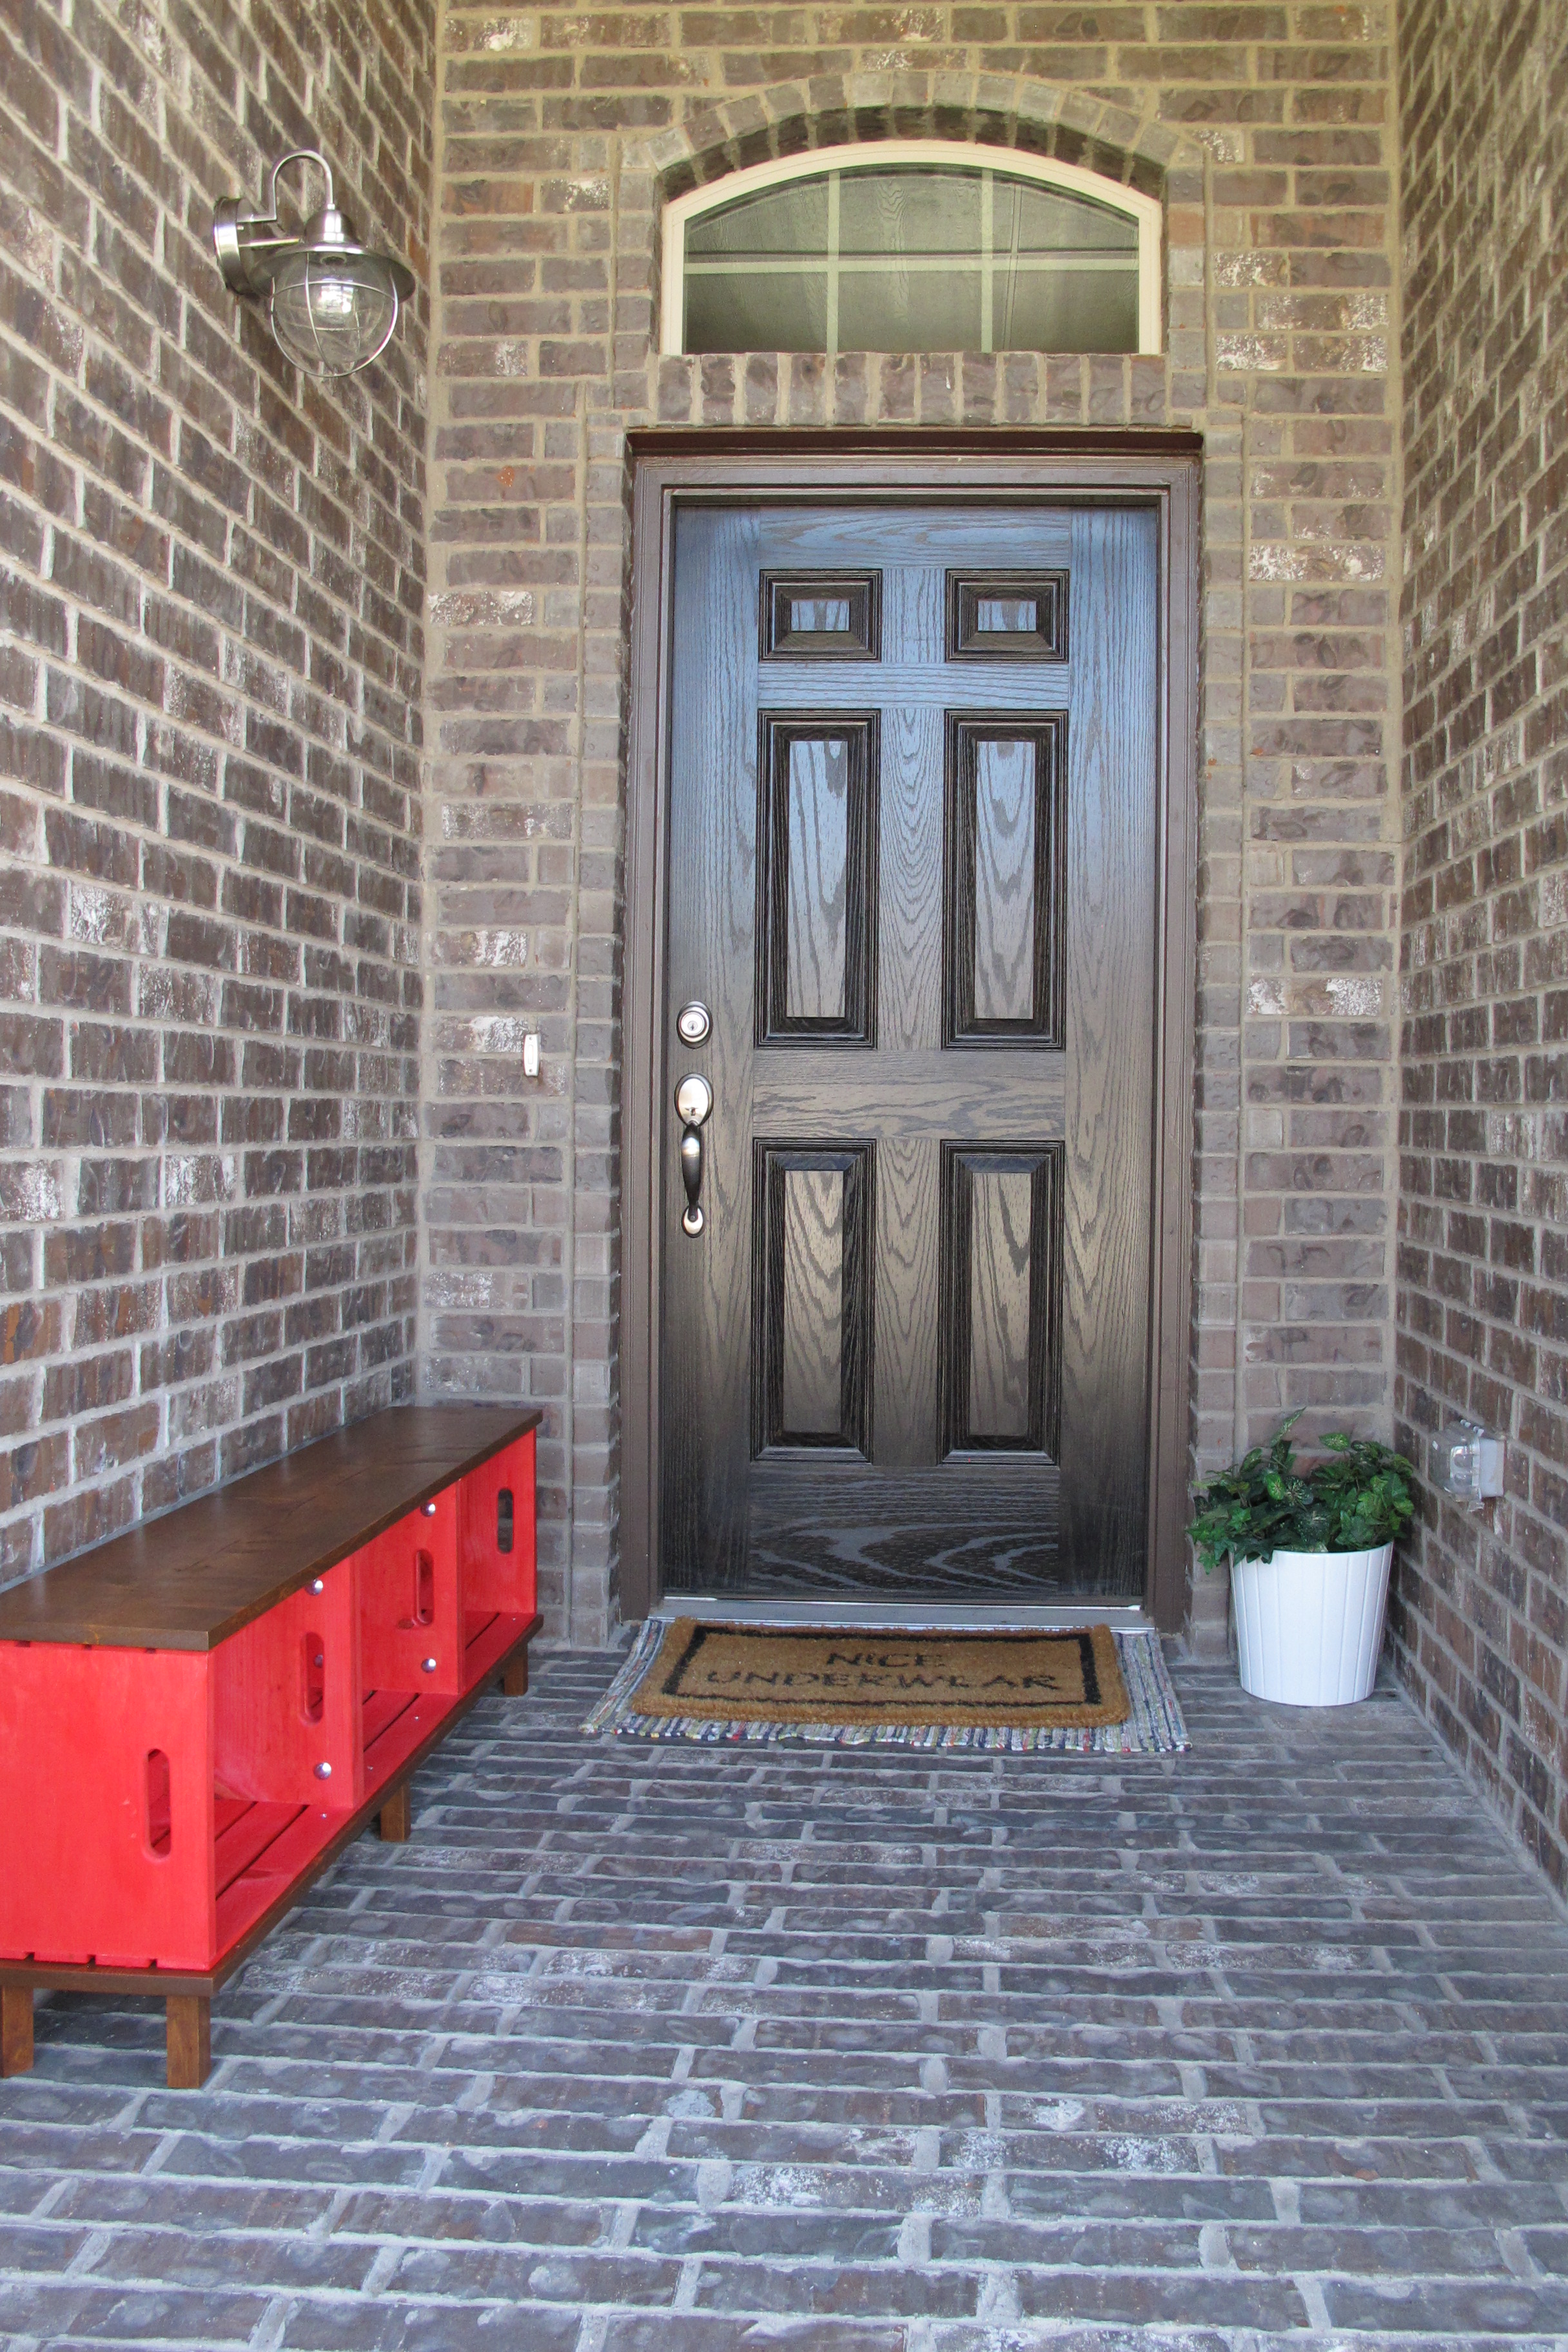
I absolutely love it! It turned out better than I imagined. I feel like the industrial schoolhouse vibe was totally achieved and it adds a nice punch of color to our porch. Plus, crates + bricks are sexy. Forhousestuff. Just sayin’. I still need to treat the bench with something more inclement-weather friendly now that it’s final placement is determined. Honestly, I really thought this guy’d end up in the foyer so I wasn’t too worried about that in the painting/treating stages. I’ll get that done soon to keep him looking healthy. In the meantime, I will spend my free time sitting and staring at him with a goofy smile on my face. Crate. Mission. Accomplished.
Update: It’s been approximately 9 months since we built this bench and I’m happy to report that it’s still going strong. It has remained in only outdoor covered areas (first our front porch, and now our covered back patio) and it has suffered no damage or weakening whatsoever and remains sturdy as can be. I can’t speak for how it would fare if left in exposed outdoor areas, but it seems to be perfectly fine if sheltered from the sun and rain. We still couldn’t be happier with this project. 🙂
So, that’s my contribution to The Great Crate Challenge! Now, check out the other awesome projects created by my fabulous bloggy friends….
 |
 |
 |
 |
 |
 |
 |
 |
 |
 |


Quite the little wood workers in your family! LOVE the red and stain together! Gorgeous!
Thanks so much Nicole!!! 🙂
when you eventually treat the porch bench so it will be protected from the elements, Please post the name of the product you use, so those of us who feel inspired don’t have to re invent the wheel, Thx!
I really enjoyed the Great Crate challenge- you ladies should do something similar every once in a while. Maybe once/yr?
Sort of reminds me of the HGTV contest’ Flea Market Flip’, where teams are given a theme and have to create something from flea market finds( like’ make something into a planter’ or ‘ make something from a mirror)
Loved your crate challenge! How fun! What size crates did you all use?
Thanks so much! 🙂 The crates are 12″ x 9.75″ x 18″. We actually have been doing a monthly DIY challenge since then. Here are some links… https://operationhomeblog.com/2015/01/14/tray-matchbox-car-organizer-diy-monthly-challenge/
And we have more planned for the coming months, so I hope you stop by to check them out. 🙂
Looks awesome, C!!! Might join this little challenge on my own… lol
What a cool idea. And hey any excuse to go to Michael’s is allllllllll good.
MB
Thanks, B!!! And, right??!!! Michael’s is the bee’s knees!! 🙂
Oh. My. Goodness. I absolutely LOVE it, Christina! You did a phenomenal job. What a great idea! My home decor is seriously going to consist of wooden crate hacks because of this challenge! 🙂
Haha!!! I totally know what you mean! I bought an extra crate since I was at Michael’s already and the wheels are totally turning!!! Thanks so much, Sarah!! 🙂
SO cool Christina! I never would have thought to make a bench and I’m totally digging the red wash with wood!!! LOVE it!
Thanks, Kristi!! 🙂
STOP IT RIGHT NOW!! I cannot even take it. I am in love. This is amazing. Everything about it from the technical plans to the amazing color to the sheer genius of it all. So awesome, Christina!!!
Haha! Aw, thanks Bre!! I’m pretty excited about it! This is the first time that I’ve attempted something like this. 🙂
This is amazing, Christina! I love the red paint with the stain on the top! This would be perfect for my side door entry way, perfect for storing shoes, Thanks for the inspiration!
Thanks, Tara!! I really appreciate it!!! I love crates so much after this challenge. I was thinking that it could even work in a kids room to store books or toys or something! 🙂
I was thinking along those lines.
I have 5 kids(3 still at home) and no mudroom, so I was thinking of doing what you did and put a bench on my small front porch or in the garage, mane hang coat hooks over it.
You bench turned out fabulous, Christina!! Love the red with the stain!! And it looks perfect on your porch! Love how it turned out 🙂
Thanks so much, Kendra! 🙂
I LOVED your crate project! I am about to be a renter and this would be great in my son’s bedroom for all of his toys…pinning 🙂
Yay! Thanks so much!! The storage possibilities are endless when it comes to crates. Gotta love it! 🙂
So proud of you and Joey, what a team! The bench turned out beautiful!
Thanks, mom! 🙂
What a cool idea, Christina! Seriously impressive. I love it! And your plan is totes professional 😉
Hahahaaaa!!!! Always, Bre. It’s how I do! 😉 And thanks! 🙂
Whoa, this looks like a totally professional piece of furniture! LOVE the stained wood bits you added to the bottom and top. What a fun addition to your front porch! 🙂
Thanks, Erica!! What a nice compliment!! 🙂
I like the doormat best! Would love to find one like that. Oh, yeah, the crate bench is awesome. Lucky you to have a handy-dandy hubby to help. I no longer have one…..
I am new to your blog and very impressed with the bench. I love the stain you chose and the red wash is so cool. I would love to do this with a piece of furniture in the home…possibly an armoire. Did you use a foam brush or regular paint brush to apply the wash, please? Thanks for sharing your great project and all your other buds as well.
Thanks so much! I used a brush. The crates were so rough on the inside that I figured they’d make a mess of foam. 🙂
Wow!! Great idea and I love the red with the stain! Looks fantastic!
Really love it….Curious how much it ran you….?
I believe it ran me around 60 bucks. The crates were around $40 (I got 40% off one with a coupon), the bolts and nuts were around $3, the top/bottom boards were $12 total, and the legs were $4. I already had the paint/stain, etc. If I’d been patient and purchased one crate at a time with coupons, I could’ve saved another $15 or so. But, unfortunately, I’m not patient. 😉
I spent $125 today, but I’m going to make a 2 crate bench and a double decker 3 crate (6 crates total) to use as a tv stand/bookshelf. I got all 8 crates for 50% off at Michaels, the whiteboards for the double decker, nuts and bolts, 12 legs (1.48 ea), and stain.
Love it! and might I add that I love your door mat too! LOL I want one of those! 😉
Haha!! Thanks so much!!! His name is Mat and he’s the doormat of my dreams! I actually wrote a post about him a while back since I was so excited!! 🙂
In one of the tutorial photos you dhow someone working with a brown wicker basket, but I don’t see a baskert in the final product. Where is it?
My husband was only using the brown wicker trunk as a surface to place the bench legs that he was working on. It wasn’t actually part of the project. 🙂
Do you think that it’s sturdy enough to sit on?
Definitely! It’s been really sturdy for us. The sides of the crates that support the seat are solid pieces of wood and there are six of them to support the top, so we haven’t had any problems.
1. what size crates? I can’t tell from your plans.
2.I vote that you make another crate/bench for the foyer, using a different paint or technique, and show us!;)
Hi Polly!
1. The crates were 12″ x 9.75″ x 18″
2. I was actually tossing around the possibility of making another smaller version for our mudroom! We’ve moved into a different house since I posted this, but I’ll definitely be thinking about it for that space. 🙂
if you make a smaller version do you think you’d use fewer crates, or smaller crates?
I’d use fewer crates, but the same size to still provide decent storage space.
looks fantastic!
Thanks so much! 🙂
Love the bench and the nice underwear doormat!
Thanks so much!
It looks great! Do you think the bench would be sturdy enough if one would flip the crates the opposite way and then boarded the top and bottom? Wanting a little more height and room for taller shoes 😊
Thanks so much! I think it would be less sturdy that way because the slats are pretty thin and mine were stapled on. With the crates laying down horizontally the sides are solid pieces of wood and the slats just act as braces which makes it sturdier. 🙂
Love it!!!
Hi!!
This is Pili from the blog My Sweet Things. I was writing a post about crates, and then I found yours, so lovely! I wanted to share it with my readers if it’s ok for you. I placed a link direct to your site so it will be easy for everyone to visit your blog as well.
If you want to see the post here’s the link: http://sweethings.net/20-different-uses-for-crates/
Hugs,
Pili
I’d love to feature this on an upcoming crate feature I’m doing. This was a huge impact on what could have otherwise been a boring porch. So lovely.
xoxo,
Sarah @ Backwoods Babies
Thanks so much! I would be flattered!!! 🙂
What size bolts did you use for the crates by chance?
I’m making this a double decker and going to use it for a tv stand/bookshelf.
Beginner here, how do you attach the top with screws without them showing? Thx!
Hey Shelly! We screwed through the crate and the bottom of the top. We used screws that were short enough that they wouldn’t go all the way through. 🙂
What a great idea, creating a bench using crates. Why hadn’t I thought of this one? !!
Thanks for the inspiration. I just did my first DIY project following your instruction. I’m really proud.
Thanks again for this great idea.
Following your design, I made one for a window seat between two bookcases in my living room! I have been wanting to make a window seat bench there, but could not come up with a design that would work and was affordable. I needed something to go in front of a hot water floor register. This work perfect. I stained my crates and painted my boards. I was going to attach a picture here but don’t know how! Thank you so much for the great to tutorial!!