If you’ve followed me on Instagram over the past few months, you may have noticed near-constant tweaking in our kitchen as time’s passed. Friends and family who came to visit during this time *may* have thought I was bananas, since, well… didn’t we JUST complete a full-gut renovation???
Answer: YES. Yes, we did.
So, what’s the deal?? Couldn’t it be good enough as is???
Answer: No. No, it couldn’t.
But, WHY??
Answer: Because it just didn’t feel like US.
If there’s one thing that I’ve learned in our journey of homeownership, it’s that our house has to feel like OUR house. With our personalities. I need to walk in and feel happiness. Camaraderie. Kinship. I don’t want it feeling like a showroom. Look, don’t touch? Nope. It has to be functional and comfortable. I mean, I want it to look nice. Of COURSE I do. But if it isn’t comfortable for our family, then what’s the point, right?
In planning our renovation, I didn’t really know where to start. After all, this was our first project of this magnitude. I did a lot of Pinteresting. I took inspiration from my favorite blogs. I assessed what I thought would look best in the space. I did everything that I thought was “right”. I found myself very drawn to black cabinetry, but I thought that the room couldn’t handle it because of the lack of natural light on that side of the space. So, we went with grey. Once this decision was made, I researched grey cabinetry online and after seeing image after image with this emerging trend, I settled on white modern countertops, a simple subway tile backsplash and gold hardware to tie in the vintagey feel of the rest of the home. Which led us here…

Now, don’t get me wrong, I think it turned out beautifully… it just didn’t feel like home to me. It felt really fancy. And fancy people, we are NOT. And what frustrated me the most was that SOMETHING in the space bothered me… I just couldn’t pinpoint what it was.
Enter many months of tweaking the space. I tried changing out artwork, rugs, rearranging the shelving, etc. And while I achieved mini-milestones in getting us closer to the space feeling like us, it still wasn’t right.
Like I mentioned before, I knew only that the room felt too fancy. We’re casual people. We love simplicity. Clean lines. No muss, no fuss. The kitchen had some of those simpler elements, but…. I dunno. I just didn’t get it.
Over time, I came to realize that I’d basically fallen prey to following the current trends rather than going with my gut regarding our personal style. It reminded me of this situation of us having to re-buy the sofa in our last house due to a similar pitfall. You’d think I would’ve learned by now. But, clearly, no. I mean, grey cabinets with white countertops and brass hardware is very popular right now. And although it’s a crazy beautiful look and could definitely be classic, and long-lasting over the years, I doubt that I would’ve chosen this combo if images of it weren’t so readily available on the net. If I’d have gone with my instincts as to what felt like our particular style rather than trying to emulate the pretty pictures that I admired. Now, how to fix it? Obviously, I wasn’t going back to my first instinct of choosing black cabinets… No WAY. The grey was staying. I had no energy to paint them, and there was no way that we were investing in new cabinetry AGAIN. So, my mission was to make the kitchen feel more like us in less expensive, easily changeable ways, while maintaining the more permanent elements of the space.
Let’s start with the sink area…
This pic was taken just after completing the reno. We lived with it like this for a few months, but something felt off. After near-constant deliberation on my part, I realized that the light fixture irked me. It’s the 11″ globe pendant from West Elm. It’s gorgeous, but it just felt too big and too flashy for what I was going for in this space. I tried to make it work by shortening the cord. But alas, it was just too large. I knew that I could easily reuse it in our bedroom (which I have… stay tuned for that update), and fortunately, I also had West Elm’s smaller 8″ globe pendant on hand (I’d ordered it during the renovation, then missed the timeframe for returning it for a refund. Whoops.). I’d planned to use it when we finally got around to finishing our wet bar, but decided to try it here first.
Spoiler Alert: The size was spot-on.
Now, before I show you how it looks now, allow me to explain… one thing that also became apparent during these months of me staring at my kitchen incessantly for uncomfortable lengths of time, was that I LOVE contrast. And I was absolutely CRAVING it in the kitchen. It was like (Cartoon Lightbulb Moment!) “What I’m MISSING is CONTRAST”. Duh. Cool. So, before mounting the 8″ pendant light, I decided to spray paint it a lovely matte black.

BOOM. Love.
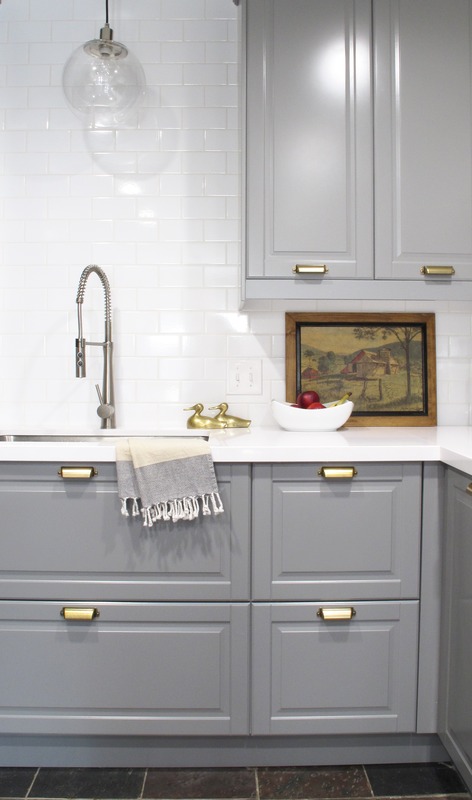
Also included in this whole “Contrast Movement of 2017” as I’ve dubbed it, was switching out the vintagey gold cabinet hardware for more streamlined matte black pulls. I have to say that this switcheroo was SO WORTH IT. Not only in looks, but in function. We’ve come to discover that traditional pulls are way easier to operate than cup pulls, especially when oriented in the middle of the doors like these are. Lesson learned. Looks-wise, I love that they’re simple and sleek and that they lend just the right amount of black to the space. Here is that sink area now…

Contrast = Achieved
Next came The Parade of Mirrors…
From the get-go, I’d wanted to add something to fill the space above the sink. Since this side of the room is pretty dark, I decided to go with a mirror to bounce some light around. You guys. I’m lucky to be married to a patient husband, because damn. He humored me every step of the way on this one. Without complaint. And I’m POSITIVE that it had nothing to do with the fact that I was pregnant and hormonal and that he feared me. Nope. Definitely nothing like that. 😉 (Seriously, though, I’m very grateful to this man and feel it would be remiss of me to not say that.)
Aaaaaannyways, I started with this mirror….

I found it at Homegoods and it wasn’t my style at all. Way too glitzy with the beveled mirror frame. Literally, the only reason that I purchased it was that it was the correct size (or so I thought at the time… it was 20″ x 40″). I was very hesitant about it, but decided to move forward with it anyways because… size. And price. It was a good deal. I figured that I could alter it in some way to make it feel more casual. Because I was so on the fence about it, I didn’t want to drill into the tile to hang it. So we hung it from the ceiling with eye-bolts and chains. It stayed like this for a few weeks, and in the end, I just didn’t really like it. Too blingy and slightly too big. I’d kept all the packaging, so I returned it, no problem.
Enter mirror numero dos. And a poorly lit night shot from my phone.

This was an 18″ by 30″ bathroom mirror from Lowe’s. With this mirror, I loved that it was simple, but feared that it was too small. We hung it on the tile with Command strips as it was relatively lightweight. And then we realized that the quality of the actual mirror was terrible (see how the reflection of the door frame is almost at 45 degrees? Yeah, really bad.). It was like a funhouse mirror, warping any image in its path. So, back to Lowe’s it went.
Now throughout this whole process, I’d been drawn to this very simple mirror from AllModern.
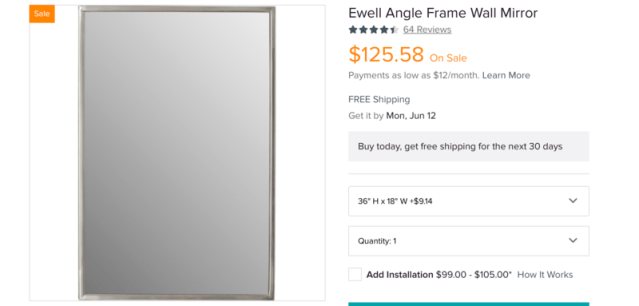
It was understated, modern, high quality per the reviews, and 18″ x 36″ – smaller than the first mirror, but larger than the second… right in the sweet spot. I kept holding off on ordering it, because it was more money than I wanted to spend, AllModern didn’t offer free shipping on returns, and supposedly, the mirror was very heavy. Thus, mailing it back would be pricey if I chose to return it and I knew that we’d definitely have to drill into the tile to hang it properly.
But, I just kept going back to it. Over and over again. So, after our second failed mirror attempt, I bit the bullet and placed my order.
It took nearly a month to arrive, but when we unwrapped it, I was IN LOVE. Enter the “I should’ve just ordered this one to begin with” thoughts. It was literally the FIRST mirror I’d been drawn to when the mirror search began and as it turns out, it was perfect for the space.

Goes to show ya that I need to trust my gut more. Joey hung it with heavy duty anchors by drilling into the tile/drywall. And to this day, every single time I glance at it, I love it more and more. It’s EXACTLY what the space needed. The size is PERFECT. And those sleek lines… Me-OW.
Now, since I’d moderned up the space so much, I still wanted to add some softness and vintagey elements to tie the kitchen into the rest of our home. We purchased this little radio and it’s my FAVORITE THING EVER.

We use it every day and now wonder how we’ve never had a radio in the kitchen before. It’s bluetooth compatible so we can stream our music or podcasts to it. Best money spent. Seriously. We hang out so much more in the kitchen now, and it makes cooking MUCH more enjoyable.
The other vintage-inspired element that I’ve recently added to the space is our new child rug…

It’s a kilim runner that I scored at World Market on sale for $37!!!!!!!!! It couldn’t possibly be more perfect for the room. It ties in the warm tones of the shelves and other wooden elements, as well as the black hardware, and it somehow makes the grey cabinets feel warmer as well. The contrast between the imperfect woven texture and the sleek white quartz countertops makes me giddy in such a nerdy way that I can’t even help myself. Plus, the added color on the ground is JUST what the doctor ordered for this space. I couldn’t be more in love with it. Seriously. I’d marry this rug if I wasn’t already taken.
Now for the “What I’d do Differentlys” (and in some cases, did)….
First, the countertops…

We chose a solid white countertop (Silestone Quartz in White Zeus Extreme). I wanted a modern sleek countertop to contrast with the vintagey hardware I’d chosen (which we’ve since switched out). Because it would be white with no variations, we wanted the strongest, most stain- and scratch-resistant material. Thus, quartz. Which is also much pricier. It was a splurge that we felt was warranted, and for the most part, it’s lived up to its claims. Except for scuffs. Sheesh. ANYTHING metal. Even if set gently on the counter leaves thin, grey scuffs which have been difficult, if not impossible to remove. I mean, with as much as we paid, we should be able to set our Yeti cups down without worry. Obviously, the counters are staying (for budget reasons), but down the line, I dream of granite with veining and pattern to camouflage stuff like this. Yes, this is how much it annoys me. Already dreaming of a switch. Will it actually happen? Probably not. I’m not sure that I can justify changing out a perfectly good countertop, but it’s fun to ponder.
Next, after living with our kitchen for the past year, we decided to make a few functional changes to the cabinetry. If you recall, we purchased our cabinets from Ikea and assembled and installed them ourselves (and by “ourselves” I mean Joey and my father-in-law did it). All-in-all, we’ve been satisfied with our purchase. We like the look of the cabinets and the soft-close hinges make them feel posh. The finish has held up well for the most part. We’ve had a few minor chips (my guess is due to toys being generously swung about), but I had the paint color-matched at Sherwin Williams and you seriously can’t even tell where the touch-ups are.
In terms of the functional changes we’ve made, first we traded out the two drawers to the right of the stove ….

For three drawers…

This was actually both for looks and function. Having 3 drawers on either side of the stove balances the space visually. Plus, once we realized that the height of the triple drawers was still tall enough to accommodate even our largest pot, it was a no brainer in terms of adding additional storage to the space. The double-drawers were fine… nothing was technically wrong with them. This switch just worked better for our family. AND we plan to reuse those two drawers in our laundry room when we eventually get to building a more permanent mud area.
Another change we made was trading out the drawer below the sink, shown in the pic below…

It looks like two drawers, but those drawer fronts are actually sistered together with a bracket to form one very tall drawer front. This set-up posed two problems. First, it was a pain to reach around that large drawer front to get to the contents. I know… first-world problems. That being said, it was annoyingly cumbersome and the drawer was constantly getting wedged open from behind for various reasons. Second (and most importantly), that tall drawer front felt really flimsy and never laid flat against the cabinet box. We feared that after repeated use, the problem would just get worse, so we decided to trade out the pull-out drawer for a pair of simple doors for the sake of longevity.
Much better. Sometimes simple is just better.
The last change we made had to do with another pull-out drawer that I’ve never photographed before now. It was that slim 12″ door beside the dishwasher…

This cabinet pulled out, drawer-style with two wire baskets attached to the door front. This front was ALSO a huge pain and never laid flat. Because it was the first cabinetry you saw when you entered the kitchen from the foyer, and it was SO far from closing flush with the cabinet box, it was very obvious. We changed out the drawer function for hinges and detached the basket slide-out from the drawer front….

We can still pull out the baskets, but now the door simply swings shut, nice and flush. This works out much better and feels more quality than the wonky pull-out of yore. So, I guess it’s fair to say that we aren’t fans of Ikea’s pull-out cabinetry. At least the trash pull-out has fared well so far. So, there’s that.
So, lets take a photo tour of where we started to where we are now.
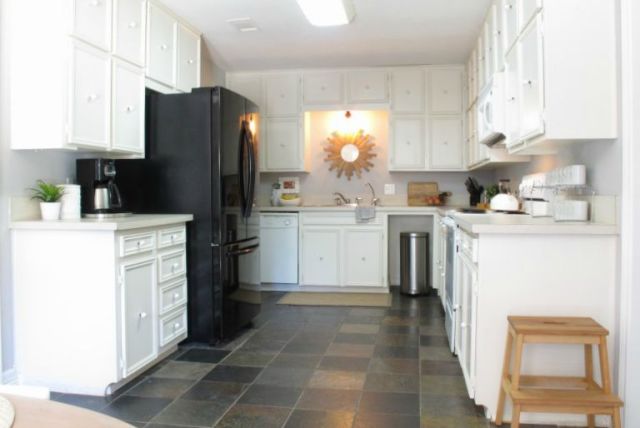
This was the state of the kitchen just before we started the renovation…
And after our renovation…
And after the tweaks I’ve made since then….

A closer view of the sink area after the renovation…
And here it is now…
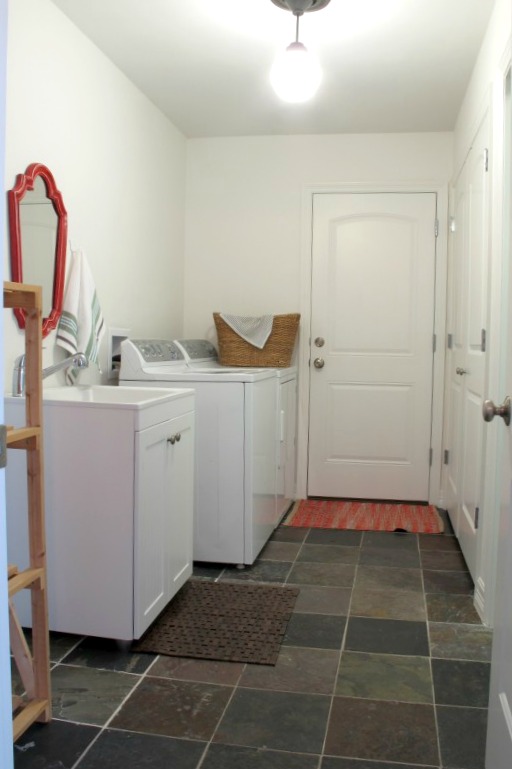
Another “before” from when we closed on the house…

And the closest view that I could find to the “before” shot after the renovation (guess I forgot to take a pic from further back)…

And a similar view to the “before” now…

A “before” of what you saw when you entered the kitchen from the foyer…

After the renovation…

And now….

I mean, the difference that cabinet hardware makes, amIright?? The kitchen definitely has a different feel now. More casual. More “us”. After all these changes, the room is definitely more our style now.
Even with how far we’ve come, I still don’t consider the kitchen totally complete yet (despite one erroneous proclamation made during one VERY excited moment on Instagram). First, we’re absolutely ITCHING to install a skylight on the sink side of the room for some much needed natural light. This is something that we’ve wanted to do right from the start, but it’s a pricier project (and one that we don’t feel comfortable DIYing) so we’ll see when we’re able to do it. You can see in the photo below where we’re thinking the skylight should go (with my MASTER photo-altering skills 😉 )

Second… Under-cabinet lighting. We tried a battery operated set from Home Depot this past fall, but it wasn’t worth it. We purchased three light strips and each used 8 AA batteries. After THREE DAYS the lights had faded to the point where you couldn’t even tell that they were on. So, that would be 24 AA batteries every 3 days?? Nope. Not happening. We’re considering other options.
So, that’s been the evolution of our kitchen to this point. Despite all the design changes, the renovation has been such a blessing. I mean, to have functioning appliances again and to have food IN THE KITCHEN has been beyond amazing. Remember the pantry we added??

STILL the game-changer of the kitchen. Star of the show. Cheese to my macaroni. I’ve actually been cooking a lot lately and it’s been awesome being able to grab ingredients that are nearby.
And I know what you’re thinking…
“Christina, but what is that beauteous artwork on your fridge??” I know. Weird how I can read your mind like that, right? 😉 Well, allow me to indulge you…

Lucas’s artwork. I’m especially fond of the accuracy of my hair. Heehee.
So, anyways, that’s the kitchen story up until this point. Have you guys ever had rooms like this? Where you thought you knew what you wanted, then changed your mind once all was said and done? Or where something was off but you weren’t sure what? What were your experiences? Tips? Tricks?
Like what you see? Please share!!