Burlap and copper pipe wall art – Monthly DIY Challenge

You guys.

It’s Monthly DIY Challenge time and, boy, do I have an easy project that packs a punch in the impact department.  And it’s cheap.  Can you tell I’m enamored?   Swooning?   In LUVVV??  I haven’t spelled “love” with a U since grade school.   That says something.  Right there.

Anyways, first of all, for anyone new to our Monthly DIY Challenge, this is a challenge that I participate in with some of my bloggy friends.  Basically, we’re assigned an item or theme and must make something with it.  Period.  Super simple and the sky’s the limit.  My personal goal in these challenges is to also keep my projects pertinent to our home.  Stuff that we need, or that can improve on form or function.   Sometimes it takes a little creativity, but it always keeps the wheels turning which is a very awesome thing.

This month, our challenge item was fabric.

fabric

I had a few ideas for this month’s challenge and after several failed attempts at other fabric-oriented projects, I ended up with a super simple tapestry wall hanging of sorts out of burlap.   See, I’d found some old burlap sacks at a thrift store a while back and I took them home with the intention of doing SOMETHING with them.   And then finally, ONE day before our pics were due for this month’s challenge, I had a lightbulb moment that put an idea to the notorious “something”.

A while back, I’d picked up the following stuff from Home Depot…

Copper pipe, brackets, and a pipe cutter.

My original plan with these items was to hang three burlap sacks side by side on one pipe, but I couldn’t find an appropriate place in our house to hang a piece that large without it making the space feel super dark (I’d initially wanted this for our hallway, but yeah, WAY dark).  So, the project kind of died.  I had this stuff on hand, just never used it.   The funny part about it was that I’d purchased a 10 foot piece of copper pipe for this very purpose.  I’m barely over 5′ tall, so here I was steering my way around HD with a pipe that was literally double my size.  You all should be proud of me.  I did not impale a single person, nor did I destroy any displays.   I did, however, collect a crowd of well-meaning passersby in the parking lot where I got many tips about how to fit the pipe into my car (through the car diagonally and out the front window for the win).  So, when I finally realized that I could still make the project happen, just with one sack instead of three, I slapped my forehead as I realized that my Home-Depot-Lancelot-Adventure was all for naught.  I totally could’ve purchased the shorter length of pipe.  Or maybe not… now I have plenty of pipe left for another project.  And another story to tell.   Glass half full, ya’ll. 😉

So, anyways, I hung my burlap sack with thumb tacks to figure out where I preferred it.   And it ended up being here…

In our guest room.   As you can see, I once again switched around the space and relocated my $7 Target-inspired bench to this wall.   It works much better here than the previous arrangement that I discussed in this post. Same story for my small dresser that was subsequently moved to the adjacent wall (ie: back to where it started).

I measured my burlap sack, which was 28″ wide.  So, I decided to cut my pipe 34″ to allow 3 inches of overhang on each side of the sack…

But, like any of my projects, there are always teeny hiccups.  Like when I went to open my pipe cutter package with a knife and apparently was feeling a little stabby…

PSA: Don’t play with knives.  I’m now on my 6th band-aid and it’s nearly bled through as I type this.   #justusescissors

Anyways, to cut my pipe, I used a hand-held pipe cutter.   You simply clamp it down on your pipe by tightening the little knob…

And twist it around the pipe a bunch of times…

As you spin the cutter around the pipe, it will begin to spin easier.  At this point, you’ll wanna tighten the knob more.  And repeat…  twist, tighten, twist, tighten, etc. until the pipe comes apart in two clean pieces…

Gaw-gee-ous. (triple-syllable Fran Drescher “gorgeous” = goodness around these parts)

Now, to deal with my burlap….

The back of my burlap sack had been cut open when the sack was emptied of its coffee bean contents, so I simply hand-stitched it up loosely with tan thread so that it wouldn’t sag once hung.

Then, I sewed the sack to my pipe with large stitches about an inch apart…

And I hung it on the wall with brackets and a few drywall anchors…

Which left this…

232323232-fp83232-uqcshlukaxroqdfv3;;62-nu=3396-6-9--78-WSNRCG=3648565954346nu0mrj

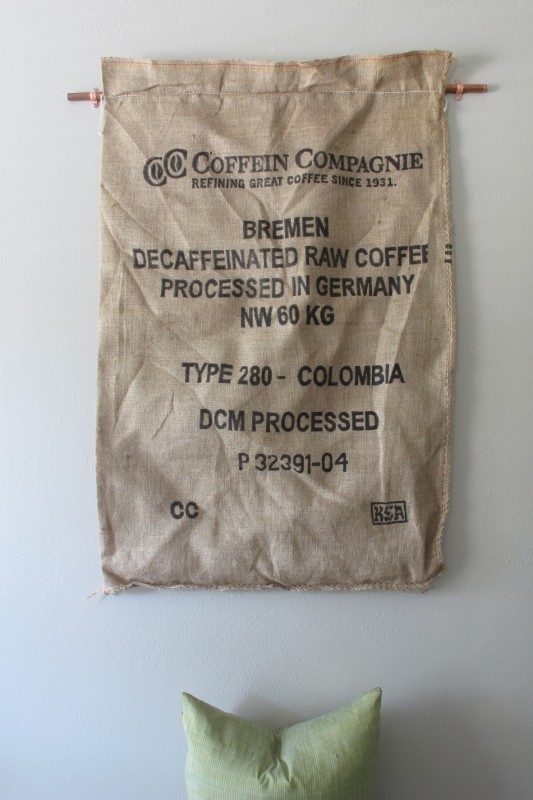
I thought about steaming the burlap to rid it of its wrinkles or possibly depositing a bit of pipe inside the sack to weigh it down and allow it to hang flat and smooth against the wall, but I decided against both options.  I love how wrinkled it is.  Everything else in the room right now is so smooth and neat that it’s a nice contrast to have something that looks a bit aged and imperfect.   I especially love it against the bold, bright fabric of the bench.  Me-Ow.   And now I’m one step closer to a finished room.   Or is it really EVER finished??  THAT is the question… 😉

So, anyways, that’s one more Monthly DIY Challenge in the sack bag!!    Now, check out the projects that my awesome buddies came up with…

TDC Before and After

Easy Gilded lamp – DIY Monthly Challenge

Howdy, folks!!  It’s time for another Monthly DIY Challenge!  The rules, you ask?  Easy… My bloggy friends and I are simply assigned a theme and must make something with it!

This month, our theme was paint!  And we were allowed to choose any kind of paint that floated our boats.

Now, I’ll admit…  My project is definitely not something new to my blog.  It’s actually one of my regular go-tos for changing up random items.  It’s quick, easy, cheap, and wholly effective, thus, it’s one of my very favorite DIYs.  You guessed it…. spray-paint!   I’m a true believer running with what works.  So, I do.  😉   And since my little blog-baby here is about our home and its progression, I wanted to choose something from the list of projects on my to-do list.   So, I chose a lamp makeover plus the transformation of the little nook that it resides in.   Basically, I’m talking spray paint + a nifty new shade + art.   It’s simple, but in my opinion, makes a world of difference in the space.  And I’m not gonna lie… I want to pet the pretty lamp every time I see it while whispering sweet nothings.   I really love how it turned out.

So, let’s start with a shot of Lucas being a ninja turtle while watching the Ninja Turtles…

While it’s pretty much the cutest thing you’ve ever seen, I’d like you to pry your eyes from the adorable Leonardo and relocate them to the decor.   This picture was taken in October of last year shortly after we moved in.   I’d actually forgotten how mis-matched it looked at first.  It makes me feel really good about myself now.  Heehee!  #bloggingmakesconfidence   This photo was taken months before we found our mid-century-dresser-turned-media-stand.  And the nook in question for the purpose of this post is that corner with the black chair.   It was clearly messy, and the orientation was wrong… it looked unquestionably better once I rotated the chair so that it was facing the sofa directly.   And that lamp…. I got it on clearance about 7 years ago at Walmart for $10.   It wasn’t a bad lamp.  It was sturdy, and it didn’t look cheap close-up, but it needed some love.  You can’t really tell in the shot above, but the shade was kind of dingy and had a dent on one side.

So, yeah… It’s fair to say that I’ve wanted to gussy up that area for some time.  Each night, my eyes would inevitably stray from Gossip Girl to the corner.  It was naked.  And not in a good way.  And I would brainstorm ways to dress it.  To make it feel more cozy and welcoming.  I experimented with some of the wall art I had on hand, but nothing looked right, so until recently, activity remained at a standstill.  That is, until we were given a super cool Fort Worth Stockyards print by Joey’s parents, which then inspired me to spring for a sweet new geometric lampshade (from Tar-jay)…

232323232-fp83232-uqcshlukaxroqdfv38-57-nu=3396-6-9--78-WSNRCG=3644;3;39;346nu0mrj

So, here we were.  And it wasn’t too shabby.  It was just VERY grey/silver.  Now, don’t get me wrong… that’s not a bad thing.  It’s just that there wasn’t anything to tie this corner in with the rest of space in terms of finishes.   I mean, sure, I have stainless steel accents throughout the space, but I also have lots of gold.   For example, our swanky new pulls on our built-ins and wet-bar…

And I wanted that corner to join the cool-kids club to make the gold seem even more intentional.   So, I whipped out the gold spray paint…

Taped off my lamp…

Wiped it down with vinegar spray to remove any dust and dirt, and gave it several light, even coats of my pretty gilded spray paint.

Now, when it comes to spray-painting, I’ve said it before and I’ll say it again… apply light, even coats with dry time in between to prevent drips.   HOWEVER… READ THE CAN.   If the label says “Paint within one hour or after 48 hours” abide by this.  For the love of Pete, save your sanity and listen to the can.  If you spray within the non-recommended time-frame (Ie: between one and 48 hours), the paint will be too dry to accept wet paint, but not dry enough to properly adhere to your item.  Thus, the spray paint will crackle and wrinkle and develop an almighty attitude.  And you will ugly-cry.  And it will be sad.  Trust me.  I know this from experience.

So anyways, I painted per the instructions on the can, then allowed my lamp to cure up in the garage for a good 24 hours.    Once he was good and dry, I pulled him back inside, which left this….

IMG_9666

IMG_9651

And just so you don’t have to scroll up, I give you “The Before”…

Although my little lamp makeover isn’t a huge change in itself, that small pop of gold really helps to tie the corner in with the rest of the space.  I think the change may be more noticeable in person.  If only I could take a picture by blinking.  Then you could see what I see.  Anyhoo, I REALLY want to change out that pillow for a more colorful kilim style pillow, but I haven’t found one that strikes my fancy quite yet.  And I have an idea for storage on the other side of the chair as well… again, it’s a matter of locating my item of choice.   I must say that having really specific decor pieces in my head can be such a pain sometimes… tracking them down is like hunting unicorns.  Ie:  Majestic creatures that *probably* don’t exist.  Not that I’d ever “hunt” a unicorn.  I’d find it, then ask it to be my friend and grant me wishes.  Because clearly unicorns speak English.  And also grant wishes.  I mean, CLEARLY.   Aaaaaaanyways, when my mythical decor items finally present themselves, I’ll let y’all know.

In the meantime, you can fully enjoy yourselves by checking out the fabulous projects created by my fellow bloggers for this #monthlyDIYchallenge….

TDC Before and After