Making decor decisions can be a daunting task, even for the most DIY-driven. I hope that by now, most of my readers know that deciding on decor is not an overnight thing for me. I mean, I’m definitely no expert. Decorating in my world happens little by little, one project driving the next decision, and so on and so forth. When it comes to making decisions like these and learning about home decor, it’s been exceedingly helpful for me to observe other peoples’ thought processes. What drives them and how they look at things. The small steps they take to turn blankness into beauty. So, I thought that instead of doing a normal before/after type of post like I normally would, it may be fun to break down my laundry/mudroom progress in a more detailed way. How I’ve been making those decisions. Step by step. To the end(ish). Just on the off-chance that this might help someone else to break out of that decorating paralysis.
So, let’s start with how we left the laundry/mudroom. Last we spoke about it, I had just cleaned and organized the space…
Though, I was thrilled to have the space clean, I wasn’t a fan of the multitude of brown tones in the baskets, thus, I wanted to change up the decor. My one challenge was that I needed to use what I already had. No new purchases. I had to make do with the current basket situation.
Honestly, I stared at this space A LOT. Indecisive. Unsure of how to proceed. I’d walk in. Stare. And walk out none the wiser. After weeks of this, I finally reached a point where I said “Okay, Christina. JUST DO SOMETHING.”.

Even though I hadn’t figured out everything I wanted to do, one thing I DID know was that the basket on the middle shelf needed to change. He was the odd man out on the brown-tone spectrum. The baskets on the bottom shelf coordinated with each other as did the ones on the top. So, out with the middle-man.
I decided to use my DIY pear art as inspiration and painted the basket with the same green paint as the pears (it’s an oops paint which I purchased on clearance). Which left this….

Loved the pop of color. And decided that I was on the right track, though the scale of the baskets on the bottom shelf felt off, so I swapped them. Then, I decided to add some functional art. That bottom shelf was just screaming for some variety and a nice, simple frame seemed appealing to me.
I’d been eyeing those laundry symbol cheat sheets on Pinterest for some time, and thought that a nice, framed version would be just the ticket. I dug through my stash of misfit frames and came up with this guy….

Obviously… he was brown. Ugh. More brown. Thus, he needed to be painted, but I was unsure what color to paint him. While I marinated on that, I chose to add some green to the lower left basket. So, I added stripes…

Hmmm… Okay, okay… It was okay. I wasn’t jumping for joy, but I wasn’t completely offended either. So, I decided to sit on that while I tackled the frame. I still had no clue what color to paint it, but figured that I’d never gone wrong with white before. And if I hated white, it would simply act as primer for my next color. Win-win. So, white it was. I printed out this printable on plain ole’ computer paper…

…set it on the shelf, and moved the white vase to the other side of the middle basket to help balance out the lighter tones throughout the space…

Loved the art, but not the placement. So, I hung it on the wall..

Much better. But now, I felt that lightness was lacking on the striped basket. So, I painted the trim and handles white…

Ugh. No. NONONONO.
Just. No.
Upon placing it back on the shelf, I realized that I’d inadvertently transformed my basket into a Kardashian. He was trying just a bit too hard to get attention. So, I did what any decent person would do. I apologized to my basket and painted the white trim green. Then, I flipped it around to the non-stripey side and added a faux sage plant in a galvanized bucket…

Better. Much better. Now we’re getting somewhere.
At this point, I felt I was making some progress, but that lower basket on the right was still bugging me with its brownness. So, I busted out some leftover fabric from my Target-inspired bench.
Problem??

I only had scraps.
But, have no fear… this was a job for (insert announcer voice) Iron-On Hem Tape…

I simply ironed a nice finished edge on the bottom and any sides that would be visible…

And used the hem tape to connect the scraps…

…to basically form a loop of fabric.

…Which would then be inserted into my basket to create a nice, patterned top border. Essentially, I’d created a dickey for my basket. Howard Wolowitz would be proud.
I simply folded the finished edge of my fabric over the top of my basket and secured the inner corners with straight pins…

Which left this…
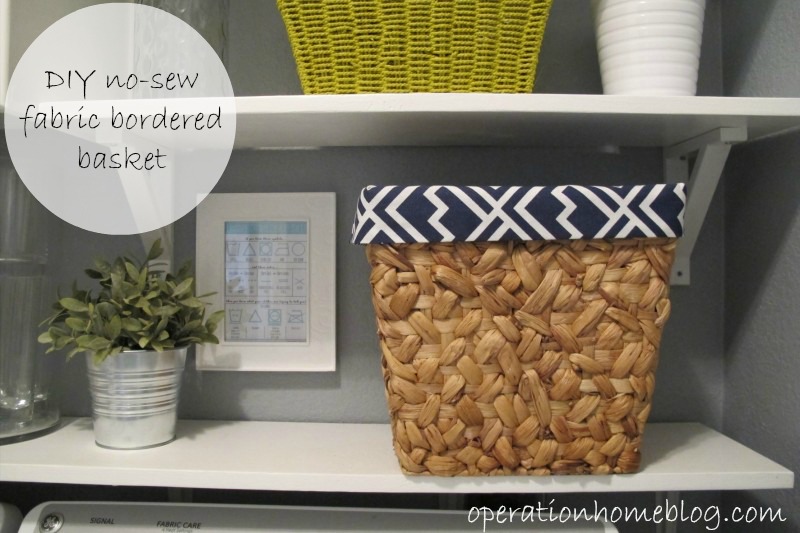
If you had a longer strip of fabric, you would only need to bond the fabric in one place to form a loop. Super easy.
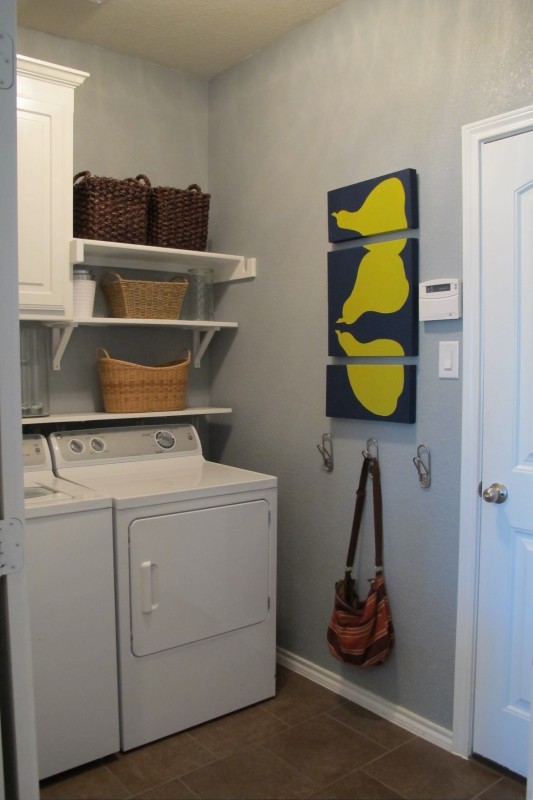
Here’s where the laundry/mudroom stands now…


And just so you don’t have to scroll back up, here’s a little before and after…

It’s so much brighter and MUCH less brown. Woo-hoo! Lucas LOVES it. He walked in there and exclaimed “Did you do this ALL BY YOURSELF??!!” and “Is so prerry!!”. Love that kid.
So, seriously, if you’re ever cursed with the dreaded decorating paralysis, my motto is: JUST DO SOMETHING.
What something, you ask? Here are a few ideas to get the wheels turning…
1. Start with a clean slate. I didn’t include this step this time because I’d already done it previously, but clear the area of all things. Then start fresh in putting things back. You never know what ideas may come once you have a blank space to work with.
2. Collect ANY item you may want to use and set them all in one place. Basically, shop out of your stuff. Having everything at arms reach might inspire ideas that you may not have had otherwise.
3. Move stuff around. Play. Experiment. Utilize different placements to see what speaks to you. This not only applies to shelves, but to rooms. Time and time again, I’ve been at an utter loss for what to do with a space, then I simply rearrange some furniture and suddenly, IT’S ON. And I know exactly what to do. In fact, I had this exact issue with both our living room and Lucas’s room. You can read about both of those struggles and the end results here and here.
4. Paint things. You can always paint them back later if you don’t like them. It’s a simple and free/cheap way to reuse stuff you already have, but make them shine in a whole new way. Another take on this concept is adding ribbon, fabric, or otherwise embellishing items to make them better suit a space.
Basically, the point is to just do something to get the ball rolling until you reach a point where you like what you see. You never know what little tweak might trigger the inspiration to start flowing.
And, I’ll be honest… these shelves still aren’t exactly where I want them. I’d like to do something with those top baskets, as well. Or possibly change them out for something that seems a little lighter visually. I’m still tossing that around. In fact, I’ll probably be noodling with these shelves for quite a bit until I reach my own little happy place. But, at least now I’m WAY closer than I was when I started. And that’s something in itself. Progress… such a sweet, sweet word. Even if there were a few hiccups along the way (*coughcough*stripedbasket!). But, hey, that’s the beauty of paint (and Craigslist… people will buy anything. Heehee!).
So, how do you overcome decorating paralysis? Any decor noodling going on in your neck of the woods?

Linked up at: Houseologie, Brepurposed, Anything & Everything, Home Stories A to Z, Lines Across, Sugar Bee Crafts, Home Coming, Tatertots & Jello, I Heart Organizing


Love these tips!!! And your laundry room is looking great! I really like the pops of green!!
Thanks, Nicole! 🙂
Looks more polished now! Great job 🙂
Thanks, Shelley! 🙂
Great tips, Christina! I LOL’d at the part about the dickey! It looks so good, though. You’d never guess. I love the color palette and everything feels so much brighter.
Thanks, Sarah! I’m really happy it’s turning out. All that brown was the total Womp-Womp of my day. 🙂
This is such a great post…I love how you walked through your thought process and decision-making…it was like a glimpse into my own brain! haha Love the fabric lined basket…
Haha! Thanks so much! I’m just glad that worked out. It was a total “winged it” moment (and totally worth it: I got to use a dickey joke on the blog. Finally.)! Heehee! 🙂
Your little changes added up to a wonderfully fresh look, Christina! I would love to know where you bought the neat-looking hooks that are underneath your pear art (which, BTW, is very cool!).
Thanks so much, Val! I found the hooks on clearance at Target… It was love at first sight. 🙂
these tips are so great! And I love the little basket with the overlapping fabric. Such a great touch!
Thanks, Bre!! 🙂
Wow. I didn’t think there was much wrong with the before…but the after does look a lot better. I’m surprised at the impact your small changes made! Nicely done. Though, I do think you should add the stripes back to the basket on the left. 😉
Thanks a bunch!!! 🙂 In all fairness, I never tried the stripes again after I repainted the white trim. One easy flip and the stripes make a comeback!!! Ill give it a try!! Thanks!!