Leaps and bounds.
This is the current position of the closet in No Man’s Land.
Leaps and bounds better than before.
Before, you ask??
I know… It was so bad that you’ve blocked it from your memories out of self-preservation. Allow me to refresh…

Let’s take a moment of silence for our closet’s previous state.
Since this point (ofsadness), I’ve organized No Man’s Land and made total headway on this closet. It’s not done yet, but here’s where we are so far…

Eh??… Eh????… SO much better, right??! (Enter cumulative sigh of relief)
While taking on this project, I kept in mind that I wanted a space for all of my craft supplies as well as gift wrap products and other miscellaneous items.
My goals were:
1. Reuse what I already had
2. Spend zero dollars
So, basically, stay true to myself and remain the cheapo that I am. And I have to say that I was successful on both counts.
As you can see, I reused this shelving unit from our master bedroom for storage…

I decided to use it to store gift bags, large and small, as well as miscellaneous knobs, handles and other hardware that may come in handy someday…

Yet another painted basket that I gave a coat of aqua to, holds my art supplies, glue, spray adhesive and craft paint….

On top of the unit, I reused a Boholmen dish drainer from Ikea to hold things like iron-on letters, cork tiles, prints that haven’t found a home yet, and sponges. I used the silverware portion for paintbrushes…

I won this desk organizer at a Keno game at my mom’s house a while back…

I forgot to take a before pic… Imagine it sans paint smudge. This organizer wasn’t really my style and I didn’t have space for it on our desk anyways. So, I decided to use it a little non-traditionally. I painted it coral with some craft paint, then topcoated it with some Polycrylic to protect the finish. And then I turned it into a gift wrap station…


It fits the gift wrap perfectly, along with folded tissue paper, gift wrap scraps, scotch tape, and markers for labeling. I had an extra slot, which I plan to fill with labels and tags, but until I refill my stash, I thought it would be a good place for my hot glue sticks.
Remember that time a while back that I created a drop-zone behind Lucas’s door? And I nixed the hook plaque for aesthetic reasons? Well, I saved it all this time and combined it with some leftover hooks from our bathroom makeover…

I painted it with some blue all-purpose craft paint, added the hooks, and mounted the entire contraption to the wall……

…to create some low-profile hanging storage for scissors and such. Our hot glue gun got its own little “holster” using a galvanized bucket and some picture-hanging wire…

Our previous nightstand (which is actually a cd rack) was repurposed for fabric storage…

I simply turned it on its side and removed the adjustable shelves (they would’ve cut the long slots in half to make perfect squares). I have to admit… I felt pretty brilliant when I came up with that one. It’s the little things, ya’ll… 😉 As for the blue buckets… I purchased these about a year ago from Goodwill. To maximize hanging storage space, I removed the hanging bar and threaded it through the basket handles, easy-peasy…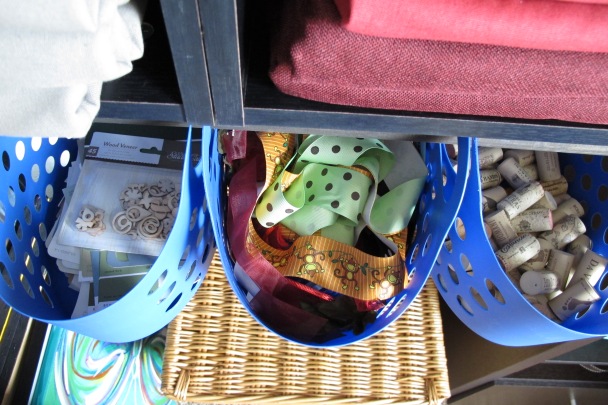
I’m currently using them to store various odds and ends such as corks, ribbon scraps, paint chips and random crafty items.
Another form of ribbon storage that I utilized was this idea that I saw on Pinterest…

I just threaded the ribbon onto a pants hanger. Super simple.
Lastly, above my new fabric storage I placed my sewing machine and sewing kit.

My grandmother gave me this kit when I got married and I love it. The pattern and color is adorable. I actually used this as my inspiration piece when it came to choosing paint colors for the smaller painting projects in the space.
Needless to say, I’m absolutely thrilled with the closet so far. There are a few more tweaks I’d like to add in the future, but as of now, it’s like a breath of fresh air. I know where everything is, and it looks kind of cute to boot. 
So, I have to admit… right now, I pretty much feel like this…

{source}

Linked up at: Tatertots and Jello, I Heart Organizing, Lines Across, I Should Be Mopping the Floor, Elizabeth Joan Designs, Home Stories A to Z, Anything & Everything Turn It Up Tuesday


What a transformation!!! I LOVE that you found a place for everything with a budget of zero dollars!!! FANTASTIC Christina!
Haha! Thanks, Kristi! I’m pretty excited about it! And have this sudden urge to craft…. 🙂
Your closet looks amazing. Your soo creative
Thanks, Amanda! I’m just thrilled that I can find stuff now. 🙂
This looks fabulous!! Much better than before and it’s so cute! I definitely think it’s time to get crafting 🙂
Haha! Agreed!!! Thanks, Bre! 🙂
Whoa, this has turned out so great! I love when things cost 0 dollars and you can just reuse things you already have – so clever! I’m inspired to tidy up my own craft closet, now!
Haha! Yay!! Thanks, Erica! I really had fun McGyvering my old stuff. 🙂
New follower from TDC ! Love your blog 😉
Yay!!! I’m so glad! Thanks so much! 🙂
I reeeeeally need to do this. My craft closet is out of control! You did such an awesome job! And I can’t believe you did it so cheaply!
Haha! Thanks so much! I was totally girl-on-a-mission! 🙂
Looks great! Love the coral painted organizer! Thanks for sharing with us at Your Designs This Time!
Erin & Emily
Looks great! Love the coral painted organizer. Thanks for sharing with us at Your Designs This Time!
Erin & Emily
Today, I went to the beachfront with my children. I found
a sea shell and gave it to my 4 year old daughter and
said “You can hear the ocean if you put this to your ear.”
She put the shell to her ear and screamed. There was a hermit crab
inside and it pinched her ear. She never wants to go back!
LoL I know this is entirely off topic but I had to tell someone!
I don’t actually have a house to decorate, or a ton of furniture (college days) but I love little projects that help to make a space my own, and I absolutely love gathering ideas for the future. Your blog is my favorite so far. I’ve gone through every post and pinned quite a few ideas on pinterest and I can’t wait to see more. Thank you so much for sharing your ideas, including all space and money-savers.
Thanks so much! That is such an awesome compliment!!! I absolutely love working with what I have for both the money-saving aspect and the challenge of doing it. It’s so fun and rewarding (and addictive)! You’re gonna love it when the time comes! Thanks for commenting and letting me know… You just made my night! 🙂