How to (no-sew) hem curtains while they’re still on the rod!

So, it’s no secret here that sewing hates me is NOT a strong suit of mine. I’ve done it a few times, like when Mac helped me make shower curtains for our last house, or when I recovered my Target-inspired bench, but it’s always been an intimidating process for me. So, when it came to hanging curtains in our current home, I stalled. The ceilings in this house (in the bedrooms, anyways) are much lower than our last home, so I knew that I’d have to hem our curtains to achieve that crisp, tailored look that I love.

So, when I finally manned up and hung the curtains, they stayed long and “pooly” for a bit. And every time I walked into the bedroom they stared at me with that condescending look of victory.   You will not defeat us.  Finally, I couldn’t take it anymore.  I stared back, nodded in defiance, and muttered “Challenge accepted.”

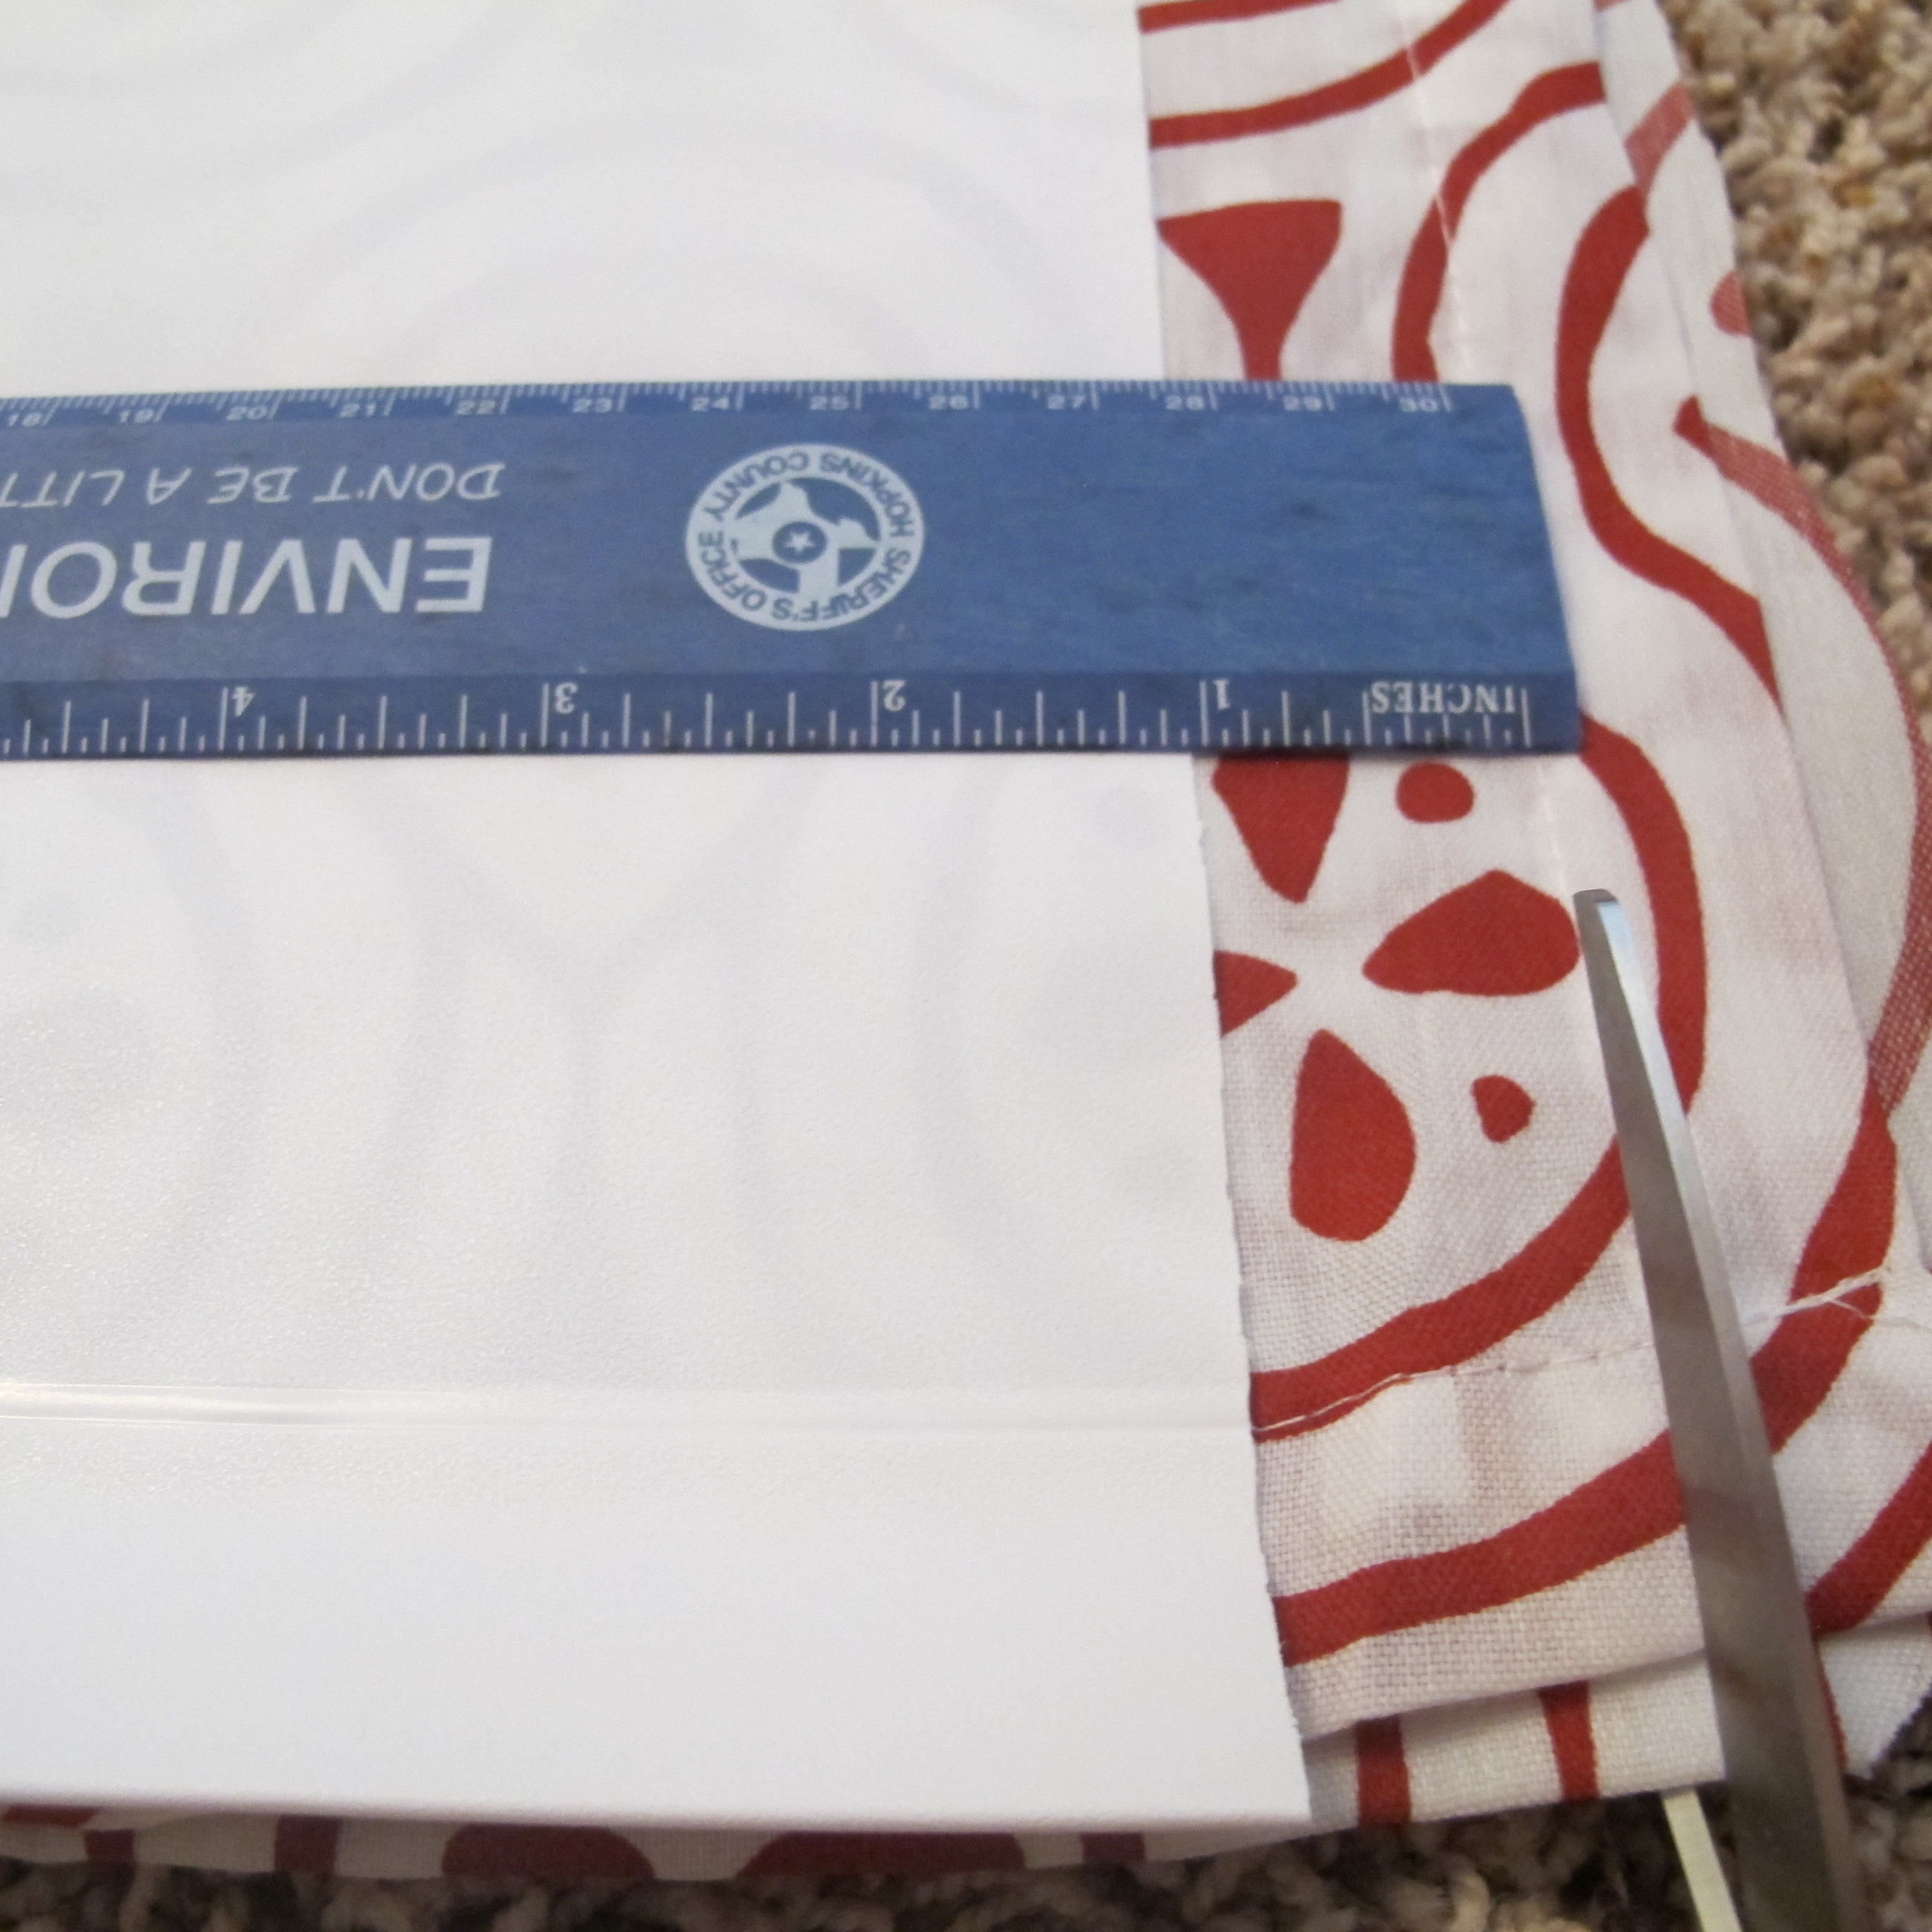
Honestly, I wish I could say that I went into it all gung-ho with pistols blazing, racing towards my final goal.  But really, although I’d accepted the challenge, the process started as one small, innocent step towards my final goal.   I simply thought, “Hey, I may as well pin them to the correct length.  At least that’ll be a good start.”…

IMG_8071

So, I did.

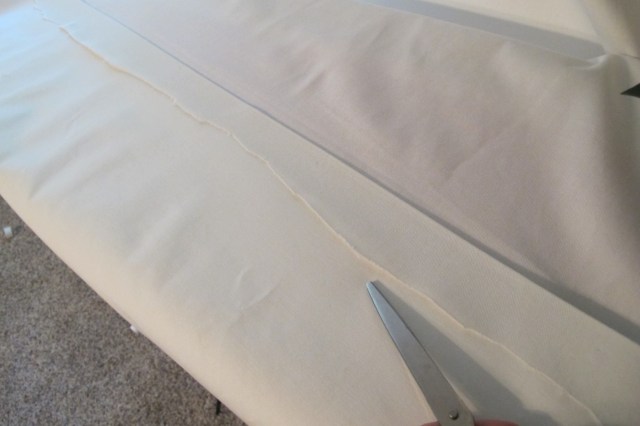
I folded up the material right at the floor and pinned them with straight pins. Then, I figured, “Well, I may as well trim the excess material while I’m at it so the bottoms don’t look quite as messy…”….

IMG_8072

So, I did.

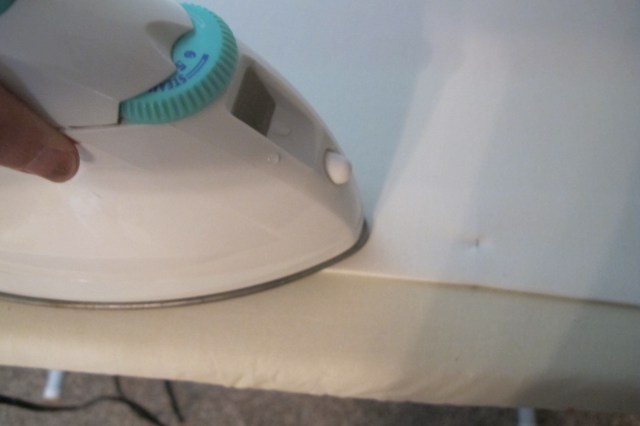
Once that was done, I thought, “Ya knooooow, if I set up the ironing board beneath the window, I could easily iron that hem nice and flat.  That should tide me over until I gather the energy to take down the curtains and officially hem them…”….

IMG_8073

So, I did.

I simply ironed right over the straight pins.

IMG_8074

Once that was done, I figured “Wellllllllll, since I already have the iron out, I may as well use some iron-on hem tape and finish off the hem…”…
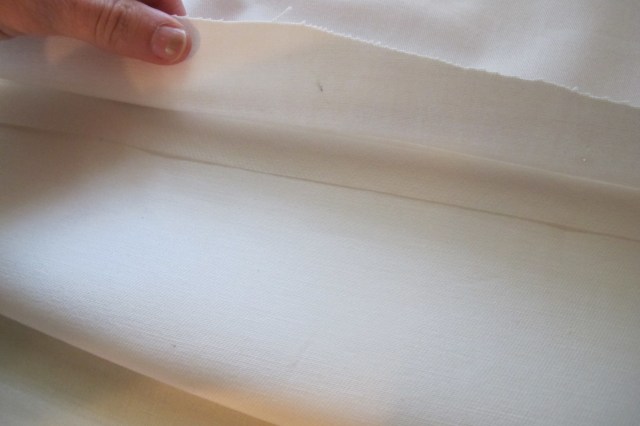
IMG_8075

IMG_8077

IMG_8078

So, I did.

Lastly, I trimmed up the excess material so that it looked much straighter than this….

IMG_8079

And done.

IMG_8081

It seriously took me about 10 minutes per panel and each panel ended up the perfect length. Needless to say, I’ll never hem a curtain any other way. It was painless, easy and fast. And to think…  I stalled and hemmed and hawed (punintended) for nothing.  All I needed was to simply get started and the rest of the process fell right into place.

Now, for some updated bedroom shots.  But first, let’s go back to where we started…

232323232-fp83232-uqcshlukaxroqdfv7997=ot-2487=7;-=;69=XROQDF-267-78773-255ot1lsi

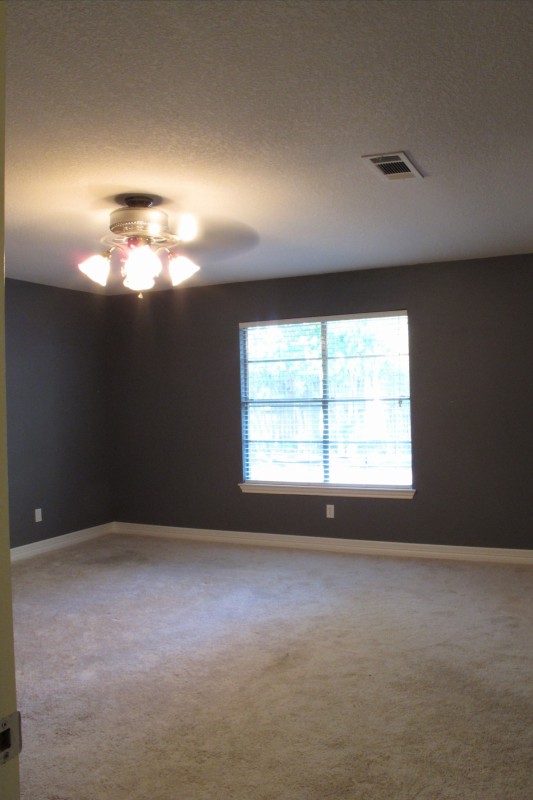
And here we are after replacing the carpet and windows, painting the walls a soothing gray, creating some DIY artwork, and adding our freshly hemmed curtains…

IMG_8167 IMG_8170

Isn’t it amazing how curtains instantly add a layer of comfort and softness to a room?  Plus, the window now makes a much grander statement in the space. Next up will be adding more artwork, and I’m still on the lookout for a new, more streamlined wood bed.

As for the “Atrium Area” as I’ve affectionately dubbed it, I’ve finally accessorized the space.  The mirror will be painted white soon and once I find some neat, geometric fabric, I’ll be applying it to the wall behind the dresser to brighten up the space.  Plus, we’ll add a cool chandelier.  It’s gonna be neat when it’s done.  That is, if it turns out like it is in my head (fingerscrossed)…..

IMG_8173

IMG_8176

So, that’s the current state of things in our bedroom.

Do any of y’all ever stall on projects that you dread, only to have that “why didn’t I do this sooner” moment once you finally get to it?


TDC Before and After

No-sew roller shades… Sort of.

Projects involving fabric have never been my strong suit. My lone fabric success story involves a recovered ottoman, which was really more about wielding a staple gun than actual “fabric work”. Knowing this, I should have probably known better than to totally wing it on DIYing fabric roller shades. But I did it anyways. So, here’s a little “what not to do” tutorial….

Ive mentioned before that our front room pulls double-duty. We use it for both an office and a guest room, and so far it’s been working out great. With one exception…

IMG_1194

Privacy for our guests.

My idea for a solution to this issue was to hang roller shades above the glass on the inside of the french doors. This way, when they’re retracted, you can’t see them from the front, but they’ll still provide privacy for our guests when needed.

So with this plan in mind, I went to Home Depot and had two inexpensive vinyl roller shades cut down to size. They were just under 9 bucks a piece including the brackets which were sold separately.

My first idea to jazz them up was to stencil a pattern onto them, but after doing a test stencil on a scrap piece of vinyl (from when the shade was cut to size), I decided that even a pretty stencil job couldn’t hide the cheapness of the vinyl.

IMG_1155

Then, I remembered that I had leftover fabric from an extra set of Ikea curtains that matched the set in the front room. Perfect! I thought about adhering the fabric to the existing shade, but decided that since I wanted the fabric to be visible on both sides, my finished product would probably be too heavy to work properly. Thus, a fabric replacement shade would be my mission.

I started by folding my fabric in half since I wanted my shades to be double-sided. I ironed the fold to create a crisp edge (To clarify: I turned the fabric good-side-out before ironing. I just forgot to snap a pic.).

IMG_1162

Then, I laid my roller shade on top.

IMG_1166

My roller shade was 18″ wide, and I wanted to cut my folded material an inch wider to allow excess material to fold under to create a clean edge (which would then be sealed with my iron-on hem tape). So, I laid my ruler down on the shade with one inch hanging over and slid the ruler up the shade as I cut with my scissors trailing behind (Which left an inch of excess material all the way up). Once I got to the top, I mimicked the length of the shade.

IMG_1168

Next, I used my finished panel as a template to cut a second panel.

Down the long side of unfinished fabric, I folded under an inch on either side of the fold, measuring as I went to be sure my final shade width was 18″ all the way down. Then, I ironed the folded-under edges. It looked like this…

IMG_1198

I used iron-on hem tape to seal the edges together down the long side of the fabric.

IMG_1204

Next, I hot glued the plastic insert (which goes at the bottom of the roller shade to give it some weight), between the bottom seams of my fabric.

IMG_1172 IMG_1174

I cut the vinyl shade off of the roller, and hot glued the top of the fabric to the roller.

IMG_1177 IMG_1178

With my shade complete, I mounted my brackets on the inside of the door and hung it up. I tugged on the bottom of the shade to get it to retract.

And nothing happened.

This is when I realized I had glued the fabric onto the roller in the wrong direction, rendering the retraction mechanism useless. So, I groaned loudly while taking down the shade, and gently ripped the fabric off of the roller. I turned the roller the other way, and this time I taped the fabric on with electrical tape (it was all we had) to make sure the shade worked before I adhered it more permanently.

IMG_1183

I rehung the shade and tugged. And the shade came right off the roller. Ugh. Tape = Fail. So, I took down the roller again and this time, hot glued AND taped the shade on in the correct orientation. I rehung it yet again, tugged, and it finally retracted. But only this far ….

IMG_1184

Doh! Nothing I did made it raise up any higher. I thought maybe it was the weight or bulk of the fabric (…which really wasn’t bad, but still…).

At this point, I’d already finished the second fabric panel but hadn’t yet opened the vinyl shade to attach it. So, I gave up and decided to hang the remaining vinyl shade on the brackets. I figured I would just buy another vinyl shade to replace the one I’d destroyed until a better plan came to fruition. I placed the vinyl shade on the brackets, tugged to retract it. And it went up this high….

IMG_1185

Aaaaaaaaand nothing I did made it raise up any higher. That’s when it hit me…

THE STINKIN’ ROLLER SHADE DIDN’T WORK TO BEGIN WITH!!! (Oy!)

Then, I laughed. Because I wanted to cry. So, (ahem!) the first step in this project should definitely be Test Roller Shade To Make Sure It Works Before Spending An Exorbitant Amount Of Time Reinventing The Wheel. Sheesh.

So, there I sat. On our couch. Staring at my one completed shade which I had rehung on the French doors. Slapping my forehead. Searching my mind for a solution to our privacy dilemma since we were having guests in a few days. And I came to the decision that until a better solution is found, I would complete the second shade and keep them both rolled up here….

IMG_1192

In my cabinet of misfit toys (um, accessories). And just manually hang them on the brackets whenever guests stay over. Just ignore the fact that they should retract. Pretend the mechanism didn’t exist at all. I mean, it really didn’t anyways. And from the front they actually look pretty cute. See??

IMG_1254

IMG_1259

IMG_1260

Here’s a back view…

IMG_1258

A little loosey goosey for my taste but not totally bad.  And they do their job as far as providing privacy.

So, that’s the story. I think maybe if I’d purchased heavy-duty roller shades instead of the cheapos this project might have worked. And if I had it to do over again, I would probably use a heavier fabric, and adhere the insides of the fabric together to prevent the shade from becoming bunchy when rolled up. I also would (*cough, cough*) do a little research. But honestly, as far as “totally winged it” projects go, it could have been worse. I still ended up with “privacy panels” (Yes. That’s what we’ll call them.). I guess, you live, you learn.

Oh, fabric. (sigh!) One day…